This page does not represent the most current semester of this course; it is present merely as an archive.
This is a small lab to expose you to the hcl2d tool we’ll use for the next several labs and homeworks.
hcl2dSee the hcl2d README for how to obtain and install hcl2d, the variant of HCL we’ll use this term.
We suggest you try HCL2D on both the lab machines and your own computer. In theory it should work on just about any computer (Linux, Windows, FreeBSD, OS X, Haiku, etc).
tiny simulatorGo to the hcl2d folder
On Linux, type
make
make tiny.exe
./tiny.exe y86/prog3.yo -q
on other platforms type
./tools/hcl2d tiny.hcl
dmd -run tiny_hcl.d y86/prog3.yo -q
(note: tiny_hcl.d is generated by hcl2d and is the actual simulator.)
Doing this should result in the following output:
+----------------------- halted in state: ------------------------------+
| RAX:         ffffd2aa   RCX:                0   RDX:                0 |
| RBX:                0   RSP:                0   RBP:                0 |
| RSI:                0   RDI:                0   R8:                 0 |
| R9:                 0   R10:                0   R11:                0 |
| R12:                0   R13:                0   R14:                0 |
| register pP(N) { pc=0000000000000003 }                                |
| used memory:   _0 _1 _2 _3  _4 _5 _6 _7   _8 _9 _a _b  _c _d _e _f    |
|  0x0000000_:   30 f2 0a 00  00 00 00 00   00 00 30 f0  03 00 00 00    |
|  0x0000001_:   00 00 00 00  10 60 20 00                               |
+--------------------- (end of halted state) ---------------------------+
Cycles run: 3
Time used: 597tiny simulatorWhen you ran make tiny.exe it also made tiny_hcl.dot That is in the input format for the Graphiz tool, which is installed by default on most linuxes and wrapped by a website for this course if it is not available.
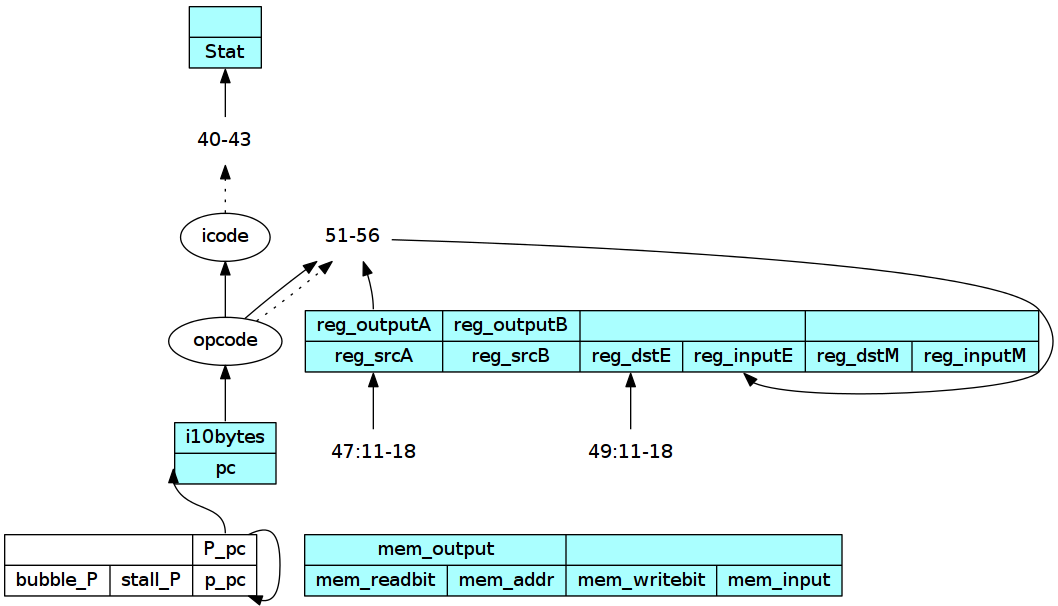
Follow the instructions in the HCL overview to create a visualization of tiny_hcl.dot. You should get an image like this:
This image contains a lot of information you should become familiar with:
tiny.hcl does not access.pc and i10bytes is the instruction memory; by setting an address to the wire pc you get access to the next ten bytes of instruction memory from the wire named i10bytes.tiny.hclreg_srcA and reg_)dstE are given hard-coded values on lines 48 (characters 11 through 18) and 49 (characters 11 through 18) respectively, while reg_inputE is given a value from the mux on lines 51 through 56.reg_srcA is given a value (the number of a register), reg_outputA produces a value (the information stored in that register).reg_inputE will be written into the register identified by reg_dstEreg_srcB or reg_dstM they default to REG_NONEStat is the status output: STAT_AOK to keep running, STAT_HLT to end the program, others for various kinds of errors.bubble_P and stall_P; we won’t use them for a few weeks.yis and yasIn addition to hcl2d, the .zip contains two C programs: yis tells you what a y86 program is supposed to do and yas is the y86 assembler.
Go to the hcl2d folder.
All of this will work from other folders too, but if you work in a different folder you’ll need to change the ./tools/whatever to match the path from where you are to the hcl2d/tools folder in what follows.
create a file toy.ys and put the following y86 into it
irmovq $6552,%rdx
rrmovq %rdx,%rax
addq %rax,%rdx
halt
WARNING because of the oddness of the
yastool provided with the textbook,.ysfiles must end with a blank line; failure will lead to incorrect behavior!
run either ./tools/yas toy.ys or make toy.yo
inspect the resulting toy.yo (i.e. open it up; you should see the assembly on the right and the binary on the left)
run ./tools/yis toy.yo; you should see
Stopped in 4 steps at PC = 0xe.  Status 'HLT', CC Z=0 S=0 O=0
Changes to registers:
%rax:   0x0000000000000000  0x0000000000001998
%rdx:   0x0000000000000000  0x0000000000003330

Changes to memory:
That output tells you what should happen: 4 instructions are run ending at instruction address 0xe with two registers changes from their default value of 0 and no changes to memory.
run tiny on toy.yo (either ./tiny.exe toy.yo -q or dmd -run tiny_hcl.d toy.yo -q)
+----------------------- halted in state: ------------------------------+
| RAX:         ffffd2b9   RCX:                0   RDX:                0 |
| RBX:                0   RSP:                0   RBP:                0 |
| RSI:                0   RDI:                0   R8:                 0 |
| R9:                 0   R10:                0   R11:                0 |
| R12:                0   R13:                0   R14:                0 |
| register pP(N) { pc=0000000000000005 }                                |
| used memory:   _0 _1 _2 _3  _4 _5 _6 _7   _8 _9 _a _b  _c _d _e _f    |
|  0x0000000_:   30 f2 98 19  00 00 00 00   00 00 20 20  60 02 00       |
+--------------------- (end of halted state) ---------------------------+
Cycles run: 5
Time used: 995
Note that tiny does not do the correct thing according to yis: it runs 5 (not 4) steps and changes only %rax (not %rdx). We’ll add better functionality over the next several labs.
pc.hclTo start exploring HCL, we’ll write a program that correctly updates the PC for straight-line code (i.e., code with no calls, rets, or jXXs).
Copy tiny.hcl to pc.hcl; you will be editing pc.hcl for this lab
Review the built-in functionality in the HCL overview.
Also, remember we declare wires as
wire foo:8;(with an explicit bit width), not the textbook’s notationword foo;orbool foo;
Try visualizing pc.hcl, as explained in the HCL overview. You’ll see the various parts of built-in functionality are in blue boxes.
Edit pc.hcl so that the pc updates work in the case where there are not jump, call, or return statements. You’ll almost certainly want to consult the Y86-64 instruction set described in figure 4.2 (page 357) to do this.
Read all of the comments. Really, all of them.
We won’t be needing to use the register file in this assignment, so remove the block of hcl that starts with the comment # let's also increment a register… (but keep the line that updates p_pc)
Have the hcl read each instruction and get it’s icode (tiny.hcl does this already)
Set the Stat output to STAT_INS (invalid instruction error) if there is a jXX, call, or ret icode; to STAT_HLT if there is a halt icode; and to STAT_AOK for all other icodes.
There is already a line Stat = [ that set the Stat to either STAT_AOK or STAT_HLT. You’ll need to change it to also set STAT_INS for some icodes.
Update the p_pc to be P_pc + an appropriate offset (1, 2, 9, or 10, depending on the icode).
There is a line p_pc = P_pc + 1; – you will need to change it so that uses a mux to select what number is added to pc. Note: you cannot use a mux as an operand to a mathematical operator like +, so either put the addition inside the mux or store the added variable in a new wire.
Example runs (all assume you run your simulator with the -q flag). I have removed the Time used
line because it does not matter for this assignment.
y86/prog1.yo should give
+----------------------- halted in state: ------------------------------+
| RAX:                0   RCX:                0   RDX:                0 |
| RBX:                0   RSP:                0   RBP:                0 |
| RSI:                0   RDI:                0   R8:                 0 |
| R9:                 0   R10:                0   R11:                0 |
| R12:                0   R13:                0   R14:                0 |
| register pP(N) { pc=000000000000001a }                                |
| used memory:   _0 _1 _2 _3  _4 _5 _6 _7   _8 _9 _a _b  _c _d _e _f    |
|  0x0000000_:   30 f2 0a 00  00 00 00 00   00 00 30 f0  03 00 00 00    |
|  0x0000001_:   00 00 00 00  10 10 10 60   20 00                       |
+--------------------- (end of halted state) ---------------------------+
Cycles run: 7
y86/prog7.yo should give
+------------------- error caused in state: ----------------------------+
| RAX:                0   RCX:                0   RDX:                0 |
| RBX:                0   RSP:                0   RBP:                0 |
| RSI:                0   RDI:                0   R8:                 0 |
| R9:                 0   R10:                0   R11:                0 |
| R12:                0   R13:                0   R14:                0 |
| register pP(N) { pc=000000000000000b }                                |
| used memory:   _0 _1 _2 _3  _4 _5 _6 _7   _8 _9 _a _b  _c _d _e _f    |
|  0x0000000_:   63 00 74 16  00 00 00 00   00 00 00 30  f0 01 00 00    |
|  0x0000001_:   00 00 00 00  00 00 30 f2   02 00 00 00  00 00 00 00    |
|  0x0000002_:   30 f3 03 00  00 00 00 00   00 00 00                    |
+-------------------- (end of error state) -----------------------------+
Cycles run: 2
Error code: 4 (Invalid Instruction)
y86/poptest.yo should give
+----------------------- halted in state: ------------------------------+
| RAX:                0   RCX:                0   RDX:                0 |
| RBX:                0   RSP:                0   RBP:                0 |
| RSI:                0   RDI:                0   R8:                 0 |
| R9:                 0   R10:                0   R11:                0 |
| R12:                0   R13:                0   R14:                0 |
| register pP(N) { pc=0000000000000019 }                                |
| used memory:   _0 _1 _2 _3  _4 _5 _6 _7   _8 _9 _a _b  _c _d _e _f    |
|  0x0000000_:   30 f4 00 01  00 00 00 00   00 00 30 f0  cd ab 00 00    |
|  0x0000001_:   00 00 00 00  a0 0f b0 4f   00                          |
+--------------------- (end of halted state) ---------------------------+
Cycles run: 5Submit a file named pc.hcl on the submission page.