This page is for a prior offering of CS 3330. It is not up-to-date.
Changelog:
upper byte of each bitshould have been
upper byte of each 16-bit value) in discussion of
_mm_shuffle_epi8.__m128i* on _mm_loadu_si128 call._mm_shuffle_epi8; point to an example that now exists on the SIMD function reference page. Also add a note about the existence of less-than-128-bit store intrinsics.avg.These assignments are accompanied by two related labs: looplab and SIMDlab.
These homeworks are both the same file and are submitted as the same submission entry. However, they have distinct due dates. I’ll take a snapshot of the submissions at rotate’s due date (just before SIMDlab) and use it to compute rotate’s score. I’ll use submissions up until smooth’s due date and use it to compute smooth’s score.
You may work with a single partner for both smooth and rotate, or may work alone.
Q: Can I switch partners between rotate and smooth?
A: It can be done, but you’ll need to talk to Prof Reiss so he can fix the grading script to handle your swap.Q: Can I have a partner for rotate and then work solo for smooth?
A: YesQ: Can I work solo for rotate and then have a partner for smooth?
A: It can be done, but you’ll need to talk to Prof Reiss so he can fix the grading script to handle your joining up.Q: Can we work in a group of three?
A: No
The following kinds of conversations are permitted with people other than your partner or course staff:
drawings and descriptions of how you want to handle memory accesses across an image
code snippets explaining optimizations, but only for code unlike the smooth and rotate problems we are discussing
discussion of the code we provide you: how RIDX works, what the naive implementations are doing, etc.
Download perflab-handout-F2017.tar on a Linux system. (Last updated: 2017-11-05 21:22)
run tar xvf perflab-handout.tar to extract the tarball, creating the directory perflab_handout.
Edit kernels.c; on lines 12 through 20 you’ll see a team_t structure, which you should initialize with your name and email (and your partner’s, if you have one), as well as what you’d like your team to be called in the scoreboard.
kernels.c is the only file you’ll get to submit, though you are welcome to look at the others or even modify them for debugging purposes.
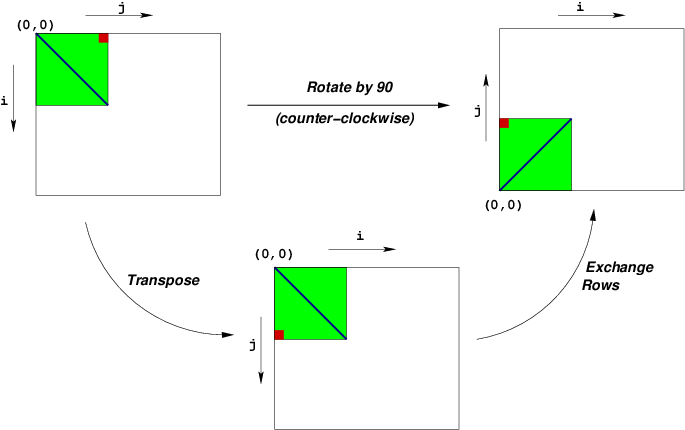
This assignment deals with optimizing memory-intensive code. Image processing offers many examples of functions that can benefit from optimization. In this lab, we will consider two image processing operations: rotate, which rotates an image counter-clockwise by 90◦, and smooth, which smooths
or blurs
an image.
For this lab, we will consider an image to be represented as a two-dimensional matrix M, where Mi,j denotes the value of (i, j)th pixel of M. Pixel values are triples of red, green, and blue (RGB) values. We will only consider square images. Let N denote the number of rows (or columns) of an image. Rows and columns are numbered, in C-style, from 0 to N − 1.
Given this representation, the rotate operation can be implemented quite simply as the combination of the following two matrix operations:
This combination is illustrated in the following figure:
Note that:
Smooth is designed to benefit from different optimizations than rotate
The smooth operation is implemented by replacing every pixel value with the average of all the pixels around it (in a maximum of 3 × 3 window centered at that pixel).
Consider the following image:
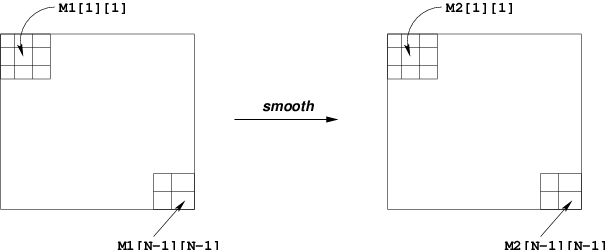
In that image, the values of pixels M2[1][1] is
| |||||||
| 9 |
In that image, the value of M2[N-1][N-1] is
| |||||||
| 4 |
Unlike rotate we provide some very detailed hints for implementing smooth below.
A pixel is defined in defs.h as
typedef struct {
    unsigned char red;
    unsigned char green;
    unsigned char blue;
        unsigned char alpha;
} pixel;
(The alpha
component represents transparency.)
In memory, this takes up 4 bytes, one byte for red, followed by one byte for green, and so on.
Images are provided in flattened arrays and can be accessed by RIDX, defined as
#define RIDX(i,j,n) ((i)*(n)+(j))by the code nameOfImage[RIDX(index1, index2, dimensionOfImage)].
All images will be square and have a size that is a multiple of 32.
In kernel.c you will see several rotate and several smooth functions.
naive_rotate and naive_smooth should not be changed. We will compare your code to the original naive code; if you change the naive code you won’t be able to tell how well you are doing.
You may add as many other rotate and smooth methods as you want. You should put each new optimization idea in its own method: rotate_outer_loop_unrolled_3_times, smooth_with_2_by_3_blocking, etc. The driver will compare all your versions as long as you register them in the register_rotate_functions or register_smooth_functions methods.
The source code you will write will be linked with object code that we supply into a driver binary. To create this binary, you will need to execute the command
$ make driverYou will need to re-make driver each time you change the code in kernels.c. To test your implementations, you can then run the command:
$ ./driverThe driver can be run in four different modes:
If run without any arguments, driver will run all of your versions (default mode). Other modes and options can be specified by command-line arguments to driver, as listed below:
-g: Display only the fastest functions (autograder mode).-f <funcfile> Execute only those versions specified in <funcfile> (file mode).-d <dumpfile>: Dump the names of all versions to a dump file called <dumpfile>, one line to a version (dump mode).-q: Quit after dumping version names to a dump file. To be used in tandem with -d. For example, to quit immediately after printing the dump file, type ./driver -qd dumpfile.-h: Print the command line usage.In order the achieve the required speedup, you will almost certainly need to use SSE intrinsics to implement smooth. With the compiler setings we are using, I have gotten speedups of around 2.6x without the SSE intrinsics, but our target is 3.8x. We have provided a guide to SSE intrinsics. For the rotate part of the assignment, we will not provide much guidance about what optimization techniques you must use. But, since most of the work in the smooth part of the assignment will be figuring out how to effectively use the SSE intriniscs, we will provide pretty detailed guideance on an effective strategy to use. This is not the only strategy you can use, and you can definitely get more speed by applying additional optimizations.
(With more aggressive compiler settings, our compiler will sometimes generate SSE intrinsics and sometimes not, depending on exactly how the code is written. In this assignment, we are trying to give practice that would be useful in the relatively common scenarios where the compiler cannot figure out how to vectorize the function for some reason, and give you an idea what the compiler is doing when it vectorizes the loop.)
There are three steps we recommend taking when implementing smooth:
On our test machine with our reference implementations:
There may be other ways, perhaps more efficient, of vectorizing and optimizing the computation. Your grade will be based on the speedup you get, not whether you follow our recommendations.
The main loop of smooth has three different cases:
The provided code figures out which of these 3 cases we are in for every pixel. Since the calculations we perform for each pixel are quite simple, this check is costly. Instead, you can write a loop over the middle of the image, which always loads 9 pixels, and separate loops for the corners and edges.
When you’ve created a separate loop for the middle of the image, remove redundant computations from it:
9 to divide by rather than counting how many pixels are addedWhen you do so, it would make sense to inline the code from avg or make a new version of avg to handle the middle of the image
case.
An additional problem removing special cases in the loop solves is that we compute the number to divide by for every pixel. This means that the compiler usually needs to generate a divide instruction to perform the division. When the compiler knows that it is performing a division by a constant, it can do something much faster.
For example, it turns out that 1/9 is approximately equal to 0x71c7/0x40000. This means that the compiler can compile
x / 9into
((x + 1) * 0x71c7) >> 18as long as it knows x is small enough (and unsigned). Even though this performs many more instructions than using a division instruction, the division instruction would take many 10s of cycles, and so is considerably slower than performing the calculation this way. But this optimization is only possible if the compiler knows that it is dividing by a constant so it can precompute (in this case) 0x71c7 and 18.
At this point, you probably have a set of loops over a 3x3 square of pixels. Unroll these loops completely (so there are nine copies of the loop body).
For this part and anything else with vector instructions, refer to our general SIMD reference and our SIMD lab:
Use vector instructions to load each of the 9 pixels into its own __m128i. Since pixels are 32-bits, using _mm_loadu_si128 will end up loading 4 pixels into an __m128i. This is okay; we just won’t use all of 128 bits loaded each time. (Later on, you can work on eliminating this waste, if necessary.)
So, for example:
// load 128 bits (4 pixels)
__m128i the_pixel = _mm_loadu_si128((__m128i*) &src[RIDX(i, j, dim)]);
will make first_pixel contain, when interpreted as 8-bit integers:
{
  src[RIDX(i, j, dim)].red,
  src[RIDX(i, j, dim)].green,
  src[RIDX(i, j, dim)].blue,
  src[RIDX(i, j, dim)].alpha,
  src[RIDX(i, j+1, dim)].red,
  src[RIDX(i, j+1, dim)].green,
  src[RIDX(i, j+1, dim)].blue,
  src[RIDX(i, j+1, dim)].alpha
  src[RIDX(i, j+2, dim)].red,
  src[RIDX(i, j+2, dim)].green,
  src[RIDX(i, j+2, dim)].blue,
  src[RIDX(i, j+2, dim)].alpha
  src[RIDX(i, j+3, dim)].red,
  src[RIDX(i, j+3, dim)].green,
  src[RIDX(i, j+3, dim)].blue,
  src[RIDX(i, j+3, dim)].alpha
}
For now, we will simply ignore the last 12 values we loaded. (Also, you do not need to worry about exceeding the bounds of the source array; going past the end of the array by 12 bytes should never segfault.)
In order to perform our calculations accurately, we need to convert 8-bit unsigned chars into 16-bit unsigned shorts in order to avoid overflow. You can do this with the _mm_cvtepu8_epi16 intrinsic function, which will take the first eight 8-bit values from a vector and construct a vector or eight 16-bit values. For now, we only use the first four values in these vectors (though, of course, the last four values will still be computed by the processor).
After loading each of the pixels into a __m128i, you can add the pixels using _mm_add_epi16. To do this most efficiently, recall our discussion of multiple accumulators.
After you’ve added the pixel values together into a vector of 16-bit values extract the values by storing to a temporary array on the stack:
__m128i sum_of_pixels = ...;

unsigned short pixel_elements[8];
_mm_storeu_si128((__m128i*) pixel_elements, sum_of_pixels);
// pixel_elements[0] is the red component
// pixel_elements[1] is the green component
// pixel_elements[2] is the blue component
// pixel_elements[3] is the alpha component
// pixel_elements[4] through pixel_elements[7] are extra values we had stored
Use the values you extracted to perform the division and store the result in the destination array. Below, we have hints if you want to perform the division and final storing of the result using vector instructions instead of one pixel component at a time.
In the previous part, you would have added 8 pairs of 16-bit values together, even though you only used 4 of the 8 16-bit results.
To fix this, let’s work on computing a pair of destination pixels at once. In particular if part of our source image looks like this:
A B C D
E F G H
I J K L
we could compute A + B + C + E + F + G + I + J + K (destination pixel F) and B + C + D + F + G + H + J + K + L (destination pixel G) at the same time.
To do this, observe that when we load 8 values (converted 16-bit integers) from the source image, we get two pixels. In particular, if pixels A and B are adjacent in memory, then, by loading from A, we get a __m128i containing
{A.red, A.green, A.blue, A.alpha, B.red, B.green, B.blue, B.alpha}and by loading from B we get a __m128i containing
{B.red, B.green, B.blue, B.alpha, C.red, C.green, C.blue, C.alpha}If we add these together using _mm_add_epi16, we get an __m128i containing the result of A+B and B+C: {A.red + B.red, A.green + B.green, ..., B.red + C.red, B.green + C.green, ...}. This is part of both the computation for destination pixel F and destination pixel G, so we can take advantage of this to help compute both in parallel.
By taking advantage of this, you can make the loop work on pairs of values which are adjacent in the source array. In fact, you will probably find that you are already computing the value for the next pixel.
Note that because our images always have even sizes, you don’t need to worry about the case when not all pixels have another to be paired with.
In this case, it happens that loading 128 bits from memory got us two pixels we wanted to work on parallel. If that wasn’t the case, there are instructions to shuffle
the bytes in the %xmm registers. Some of them can be accessed via intrinsic functions containing the word shuffle
. (If you didn’t have these instructions, you could still rearrange the pixels using ordinary, non-vectorized code.)
As noted above, dividing a 16-bit number x by 9 can be performed using the calculation:
((x+1) * 0x71c7) >> 18Perform this calculation using the vector instructions. You may wish to refer to our reference of some additional vector intrinsic functions.
Hint: Although this is the formula for dividing a 16-bit number by 9, you need more than the lower 16 bits of the result of the multiplication — otherwise shifting by 18 will always yield 0 (or -1) rather than something useful. You can, however, avoid doing the entire calculation using 32-bit numbers by taking advantage of _mm_mulhi_epi16.
Then, you need convert 128-bit vector back from 16-bit to 8-bit numbers. To avoid the extra cost of doing this one pixel component at a time, the easiest way to do this is probably with the _mm_shuffle_epi8 intrinsic.
To use the _mm_shuffle_epi8 intrinsic, you will need a mask
that tells this instruction to select the 0th, 2nd, 4th, etc. bytes of the vector, to remove the upper byte of each 16-bit value. See the our reference page for an example of how these masks work.
If you want to avoid the cost of copying pixels to a temporary variable and then copying them to the destination imgae, there are SSE intrinsics that correspond to functions that write only 32 bits (one pixel) or 64 bits (two pixels) from the vector. You can use these to write one or two pixels at a time directly to the image, rather than writing values to the stack and copying them to the image.
In addition to the above optimization, there are ways that can probably get more speedup:
We will be testing the performance of this program on our machine. We will be build your programs with the same compiler as on the lab machines. For this compiler gcc-5 --version outputs gcc-5 (Ubuntu 5.4.1-2ubuntu1~14.04) 5.4.1. We will compile your submitted files using the options -g -Wall -O2 -std=gnu10 -msse4.2.
Our testing server has an Intel Skylake
processor with the following caches:
The size of a cache block in each of these caches is 64 byte.
Things about our processor that some students might want to know but probably aren’t that important:
Violations of the following rules will be seen as cheating, subject to penalties that extend beyond the scope of this assignment:
Additionally, the following rules will result in grade penalties within this assignment if violated:
Speedups vary wildly by the host hardware. I have scaled the grade based on my timing server’s hardware so that particular strategies will get 75% and 100% scores.
Smooth and Rotate will each be weighted as a full homework assignment in gradebook.
Rotate will get 0 points for 1.0× speedups on my computer, 75% for 1.5×, and 100% for 2.5× speedups, as expressed in the following pseudocode:
if (speedup < 1.0) return MAX_SCORE * 0;
if (speedup < 1.5) return MAX_SCORE * 0.75 * (speedup - 1.0) / (1.5 - 1.0);
if (speedup < 2.5) return MAX_SCORE * (0.75 + 0.25 * (speedup - 1.5) / (2.5 - 1.5));
return MAX_SCORE;
Smooth will get 0 points for 1.0× speedups on my computer, 75% for 2.2×, and 100% for 3.8× speedups, as expressed in the following pseudocode:
if (speedup < 1.0) return MAX_SCORE * 0;
if (speedup < 2.0) return MAX_SCORE * 0.75 * (speedup - 1.0) / (2.2 - 1.0);
if (speedup < 3.8) return MAX_SCORE * (0.75 + 0.25 * (speedup - 2.2) / (3.8 - 2.0));
return MAX_SCORE;
Exact speedups may vary by computer; see this viewing page to view your latest submission’s results on my machine. We will also post a scoreboard of everyone’s latest submission times.
You will submit only kernels.c, and need submit it only once per homework though you probably want to submit it often to see what my server’s timing results are.
Submit at the usual place. One of my machines will attempt to time your code and post the speedups I find here. You may also view more detailed results (timings for each version of rotate and smooth) for your submission here. Since running all of the timing for everyone’s code can take a while, expect 30-60 minute delays before your results are posted. I time all of your code and report only the fastest run of each method, so it is in your interest to have several optimizations in your submission; note, however, that if your code runs for more than a couple minutes I will stop running it and post no results.
If you are in a team, it does not matter to me if one or both partners submit so long as at least one does.