


![Walks on Water [CC BY-SA 3.0 (https://creativecommons.org/licenses/by-sa/3.0)] scale icon](/~cs1112/images/scales.png)
Class 31 — Friday April 16
Graphical drawing
Drawing a picture — Except that you must use words — Please no ink on screens
Look both ways
Agenda
- Start image manipulation
- Checkout last semester artistry submissions
- Checkout artistry best in shows submissions
Examples
To do list
- Look over artifacts
- Do outstanding homework
- Review Pillow drawing module documentation
- Go over this page
Pillow discussion
- The primary Python package to support graphics and image manipulation is Pillow. Pillow is not part of the standard Python install; you have to add it yourself. To install Pillow on your laptop go here. The parts of Pillow of interest to us are:
- Image : Pillow representation of an image.
- ImageDraw: Pillow image drawing commands.
- To gain access to Pillow functionality the module
PILneeds to be imported. The typical way to gain access toImageandImageDrawis statement
from PIL import Image, ImageDraw
- The code segments presented here are available in pillow_painting.py
Image
- The Image function that we care about for now is its
new()function — through it we can construct a new image.
- Function invocation
Image.new( m, size, color='Black' )returns a modemnew image, whose dimensions are given bysize, and whose background is filled-in usingcolor.
- Parameter
coloris optional with a default value of black.
- The units of measure for
sizeare in pixels.
- Parameter
sizewill always be an ordered pair of the form( w, h ), wherewis the width of the image andhis the height of the image.
- For us,
mwill always be the string'RGB'; this mode uses differents levels of red, green, and blue to produce other colors.
- The following code segment defines a new image object called
im. The image is 480 pixels wide and 400 pixels high and its background color is midnight blue.
im_width = 480
im_height = 400
dimensions = ( im_width, im_height )
im = Image.new( 'RGB', dimensions, color='Black' )
- The color names that Pillow knows about are the standard web colors. A list of them is available.
- An object of type
Imagehas a method functionshow()that will create a pop-up window displaying its image.
- To see our new image do
im.show()
- To save a copy of an image use its method function
save().
im.save( 'canvas.jpg' )
Function
save()expects a string parameter giving the name for the picture file. The file will be located in the same folder as the program that did the saving.
ImageDraw
- Given an
Imageobject, you can access its drawing surface through functionImageDraw.Draw().
- Suppose
imis an image. My preference is to call the drawing surfacecanvas. The following statement initializescanvasto be the drawing surface for imageim.
canvas = ImageDraw.Draw( im )
- The origin
( 0, 0 )for a Pillow drawing is the upper-left-hand corner of the image.
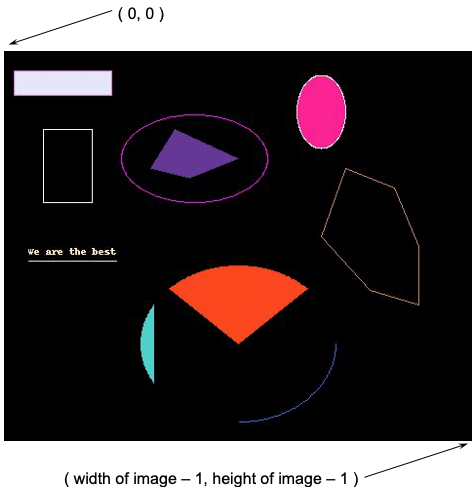
- Most drawing commands in Pillow require a two-element argument that gives the location and size of the shape. The first element of the pair is the location of the upper-left-hand corner of the shape; the second element is the lower-right-corner of the shape. The usual Pythonic name for the ordered-pair is
xy.
ImageDrawfunctionrectangle()is one such command .
- The following code block indicates the shape is to be situated at
( x, y )and extend to( x+w, y+h ).
x = 40
y = 80
w = 50
h = 75
xy = [ ( x, y ), ( x + w, y + h ) ]
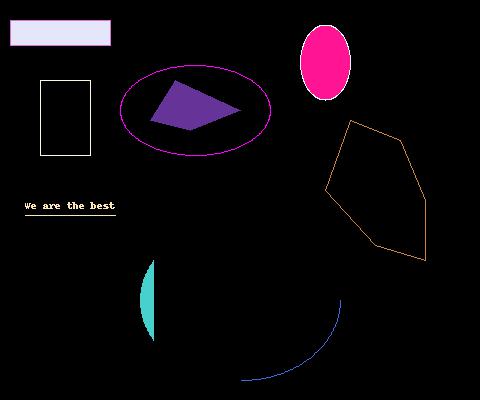
canvas.rectangle( xy, outline='Cornsilk' )
The produced shape is a corn silk-colored outline of a rectangle. Parameter
outlineis optional, if specified its value is to be the color of the perimeter.
- Another optional parameter is
fill, if specified its value is to be the background color of the rectangle. For example,
x = 100
y = 20
w = 100
h = 25
xy = [ (x, y), (x + w, y + h) ]
canvas.rectangle( xy, fill='Lavender', outline='Orchid' )
Adds a filled-in rectangle to our drawing.
- The function to draw an ellipse (oval) is
ImageDraw.ellipse(). When drawing ellipses, the code specifies the upper-left-hand and lower-right-hand corners of the box that circumscribes the ellipse. *fillandoutlineparameters are optional parameters forImageDraw.oval()
- The following code segment adds two ellipses to our drawing.
x = 120
y = 65
w = 150
h = 90
xy = [ (x, y), (x + w, y + h) ]
canvas.ellipse( xy, outline='Magenta' )
x = 300
y = 25
w = 50
h = 75
xy = [ (x, y), (x + w, y + h) ]
canvas.ellipse( xy, fill='DeepPink', outline='GhostWhite' )
Both ellipses have their perimeter drawn; and one also has its background colored deep pink.
- Pillow also provides the means to draw text through function
ImageDraw.text(). The following code segment uses the function
coord = ( 25, 200 )
s = 'We are the best'
canvas.text( coord, s, fill='Moccasin' )
to add the string
'We are the best'to our drawing. The first parameter to the function is the location to start the text; the second parameter is the desired text.
- Another capability of
ImageDrawis to draw a line through functionImageDraw.line(). The function requires anxyparameter and accepts optional parametersfillandoutline. The following code segment
p0 = ( 25, 215 )
p1 = ( 115, 215 )
xy = [ p0, p1 ]
canvas.line( xy, s, fill='Moccasin' )
adds a horizontal line below our text.
- For drawing polygonal shapes
ImageDrawhas functionpolygon(). The function has one required parameter a list of locationsseq. Optional parametersfillandoutlineare also available.
- The following code segment draws two polygons onto the canvas. The first polygon has its perimeter drawn; the second has its interior filled.
p0 = (350, 120)
p1 = (400, 140)
p2 = (425, 200)
p3 = (425, 260)
p4 = (375, 245)
p5 = (325, 190)
seq = [ p0, p1, p2, p3, p4, p5 ]
canvas.polygon( seq, outline='Peru' )
p0 = (175, 80)
p1 = (240, 110)
p2 = (190, 130)
p3 = (150, 120)
seq = [ p0, p1, p2, p3 ]
canvas.polygon( seq, fill='RebeccaPurple' )
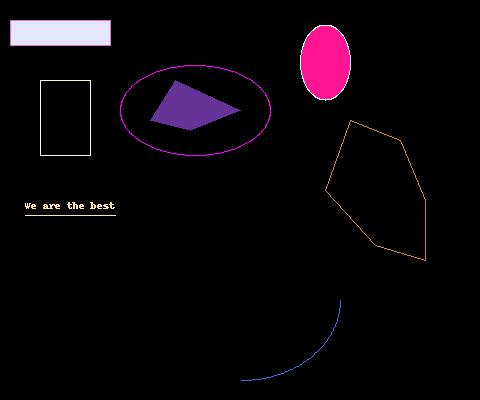
- Afterwards, the canvas now looks like

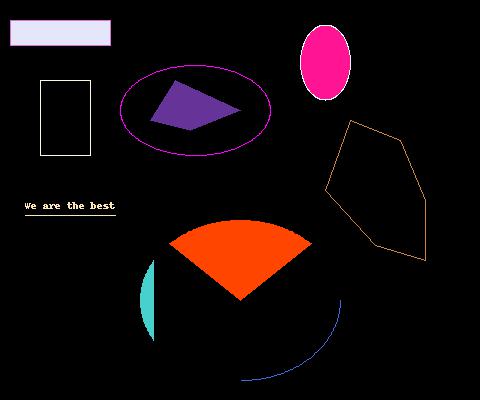
- For drawing the arcs of an ellipse use
ImageDrawfunctionarc(). The function has three required parametersxy,a1, anda2. Optional parameterfillcan be used to specify the color of the arc. The function draws an arc within bounding boxxyon thecanvas. The arc outline has starting anglea1and ending anglea2.
- The following code segment adds a colored arc to the canvas.
p0 = ( 140, 220 )
p1 = ( 340, 380 )
xy = [ p0, p1 ]
a1 = 0
a2 = 90
canvas.arc( xy, a1, a2, fill='RoyalBlue' )
Note, a 0° angle points east; a 90° angle points south; a 180° angle points west; a 270° angle points north.
- Afterwards, the canvas now looks like
- The
ImageDrawfunctionchord()supports the drawing of a chord for an ellipse. A chord connects the endpoints on an ellipse with a straight line. Likearc(), the function has three required parametersxy,a1, anda2. Optional parameterfillcan be used to specify the background of the chord; and optional parameteroutlineto color its perimeter.
- The following code segment adds a chord to the canvas.
p0 = ( 140, 220 )
p1 = ( 340, 380 )
xy = [ p0, p1 ]
a1 = 150
a2 = 210
canvas.chord( xy, a1, a2, fill='MediumTurquoise' )
- Afterwards, the canvas looks like
- The
ImageDrawfunctionpieslice()supports the drawing of a pie slice for an ellipse. Likearc()andchord(), the function has three required parametersxy,a1, anda2. Optional parameterfillcan be used to specify the background of the pie slice; and optional parameteroutlineto color its perimeter.
- The following code segment adds a pie slice to the canvas.
p0 = ( 140, 220 )
p1 = ( 340, 380 )
xy = [ p0, p1 ]
a1 = 225
a2 = 315
canvas.pieslice( xy, a1, a2, fill='OrangeRed' )
- Afterwards, the canvas looks like
Imagery
| 🦆 © 2022 Jim Cohoon | Resources from previous semesters are available. |