CSS Overview
(Please tell me if you find any errors or omissions in the document —Upsorn Praphamontripong, 30-January-2021)
What is CSS?
CSS (Cascading Style Sheet) is a style sheet language that let you style the html elements on your web page. It is embedded inside html but it is not html itself.
Note: if the web browser does not recognize any specific tags, formats, or settings, the browser will render the content based on its default styles.
Why CSS
Define how to display html elements

Can we format/style the document using html?
Separating visual presentation (CSS) from document structure (HTML) increases readability and maintaintability: (i) enable changes to one or the other and (ii) enable style to be reused across sets of elements.
How to use CSS
Inline
- Specify the style property in the opening tag of the particular html element
- Format
style="property_1:value_1; property_2:value_2; ...; property_n:value_n;" - Example:
<h1 style="color:red; text-decoration: underline;">CSS Examples</h1>
   ...
<font size=-1; color="red">
   Specify the style property in
   the opening tag of the particular html element
</font>
Document-level
- Specify the style specifications in the document head section and apply to the entire body of the document
- Format
<head>
   ...
   <style>
      rule list
   </style>
   ...
</head>
External-level
- Write the style specifications in a separated file
with the type
.css. Example: main-style.css - Link to
.cssfile in the header of the html document<head> ... <link rel="stylesheet" type="text/css" href="http://www.cs.virginia.edu/~up3f/cs4640/styles/main-style.css" /> ... </head>
Pros and Cons?
How to define CSS
Rule structure
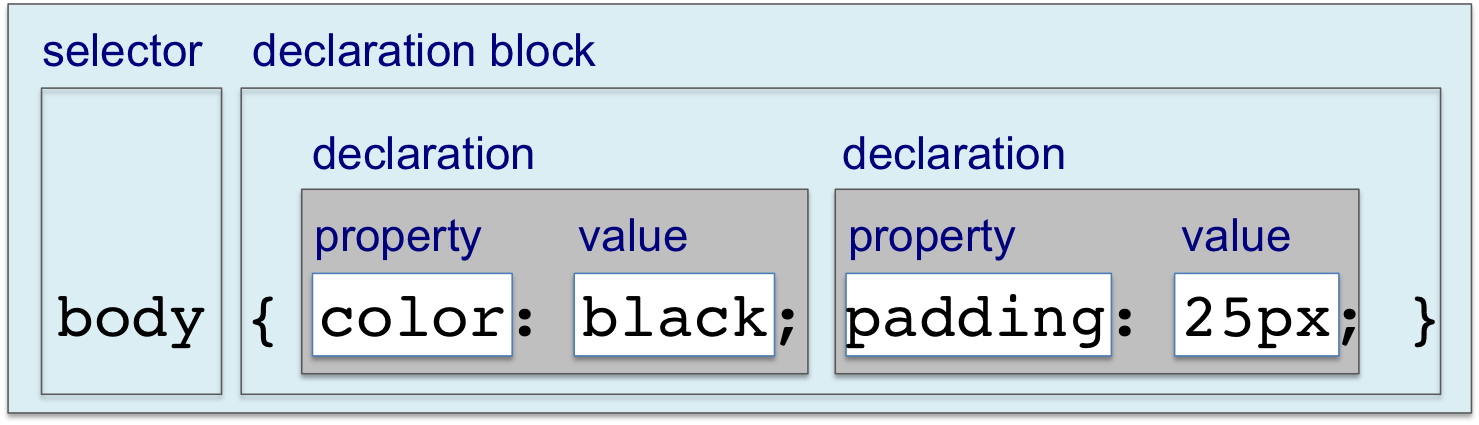
Rules control how sets of boxes and their contents are presented.
- Selector: a pattern used to select the element(s) to be styled
- Declaration: Description indicating how selected elements should be styled
p { font-family: Arial; }
- Selector: select and apply the style to all
<p>elements - Declaration: use Arial font family
Types of selectors
- Element (Simple selector or type selector):
Apply to a particular element name
or a list of element names separated by commas
Example:h1 { property-value list } h2, h3 { property-value list }Apply these properties to all<h1>
- Id selectors:
Allow the application of a style to one specific element
(apply to the element with the given id).
- Each element can have only one id
- Each page can have only one element with that id. Thus, a separate rule must be written for each element.
- Use when there is a single element on the page that will take the style.
#intro { color: green; font-size: 0.8em; }Usage:<p id="intro"> This is a short introduction to writing CSS. Please feel free to compare page source with the screen. </p>
- Class selectors:
Allow different occurrences of the same element
to use different style specifications
Example:p.normal {property-value list} p.warning {property-value list}Usage:<p class="normal"> A paragraph of text that we want to be presented in normal presentation style </p> <p class="warning"> A paragraph of text that is a warning to the reader, which should be presented in an especially noticeable style </p>
- Generic class selectors:
Can be applied to the content of more than one kind of element
(defined without an element name, begins with a period)
- Multiple elements can use the same class
- A given element can have multiple classes assocaited to it
- Use to consistently style multiple elements throughout the page (or site). Classes are useful when there are multiple elements that shares the same style.
.sale {property-value list}Usage:<h3 class="sale"> Weekend Sale </h3> ... <p class="sale"> ... </p>
- Pseudo class:
Specify that certain styles apply when something happens,
rather than the target element simply exists.
Examples of pseudo classes
:active     /* elements activated by user. For mouse clicks, occurs between mouse down and mouse up. */
:checked    /* radio, checkbox, option elements that are checked by user */
:disabled   /* elements that cannot receive focus */
:focus      /* element that currently has the focus */
:hover      /* elements that are currently hovered over by mouse */
:link       /* link element that has not yet been visited */
:visited    /* link element that has been visited */
Usage:a:link { /* unvisited link */ color: red; /* text color */ } a:visited { /* visited link */ color: blue; } a:hover { /* mouse over link */ color: green; } a:active { /* current link */ color: purple; } a:focus { /* focused link */ color: purple; } /* group selectors */ a:hover, a:active, a:focus { background-color: yellow; }
Some common properties
- Color: specifies text color
color: red;             /* specified by name */
color: #ff0000;         /* specified by hexadecimal value */
color: rgb(255, 0, 0);  /* specified
Usage:body { color: red; }
- Background color: specifies background color
background-color: black;
background-color: #000000;
background-color: rgb(0, 0, 0);
Usage:body { background-color: yellow; } table { background-color:#000080; /* navy */ }
- Font family: specifies the font family of the text
font-family: Arial, Helvetica, Futura
Usage:body { font-family: Arial, sans-serif; }
- Font size: specifies the size of the font
font-size: 14px;    /* absolute size: pixels */
font-size: 1.2em;   /* relative size: 1.2 times or 120% of the current font size in pixels */
font-size: 75%;     /* relative size: 75% of the current font size in pixels */
font-size: larger;  /* relative size: adjust the font size relative to the font size of the parent element */
- Font style: specifies the font style
font-style: italic;
- Font weight: specifies the degree of boldness
font-weight: bold;
Usage:h2 { font-family: 'Time New Roman'; font-size: 2em; font-style: italic; font-weight: bold; }
- Font shorthand: specifies multiple property value in the font property
font: property-value-list
Usage:h2 { font: 'Time New Roman' 2em italic bold; }
- Text decoration: specifies some special features of text
text-decoration: line-through;
text-decoration: overline;
text-decoration: underline;
text-decoration: none;
Usage:p.delete { text-decoration: line-through; } p.cap { text-decoration: overline; } p.attention { text-decoration: underline; }
- Text indent: indent the first line of a paragraph
p.indent {
   text-indent: 2em;
}
...
<p class="indent">
   A homework exercise is not only an important contributor
   to what you learn in a class, but is often an important
   part of your grade as well. From a student's point of view,
   homework is usually the first time the information
   from the course is used, and thus is a very valuable
   early feedback mechanism that helps the student
   prepare for exams.
</p>
- Text align: arrange text horizontally
text-align: left;
text-align: center;
text-align: right;
text-align: justify;
Usage:p { text-align: right; }
- Float: specify that text should flow around some element,
often an image or a table
float: left;
float: right;
float: none;
Usage:img { float: right; }
- Padding: generate space around content
padding-top: 50px;
padding-right: 30px;
padding-bottom: 50px;
padding-left: 80px;
padding: 50px 30px 50px 80px;     /* specify space of top, right, bottom, left padding */
padding: 50px 30px 50px;          /* specify space of top, right, bottom padding */
padding: 50px 30px;               /* specify space of top, right padding */
padding: 50px;                    /* specify space of all four paddings */
Usage:p.special { padding: 25px 50px 75px 25px; }
- Border: specify the style, width, and color of an element's border
- border-style: specify the kind of border to display
- border-width: specify the width of the four borders
- border-color: specify the color of the four borders
border-style: dotted; border-style: dashed; border-style: solid; border-style: double; border-style: groove; border-style: ridge; border-style: inset; border-style: outset; border-style: none; border-style: hidden; border-style: dotted dashed solid double; /* combine multiple styles */ border-width: 5px; border-width: medium; border-width: 2px 10px 4px 20px /* specify width of top, right, bottom, left borders */ border-color: red; border-color: red green blue yellow; /* specify color of top, right, bottom, left borders */Usage:p.special { border-style: solid; border-width: thick; border-color: red; } p.special2 { border: 3px dotted #0088dd; }
Box properties
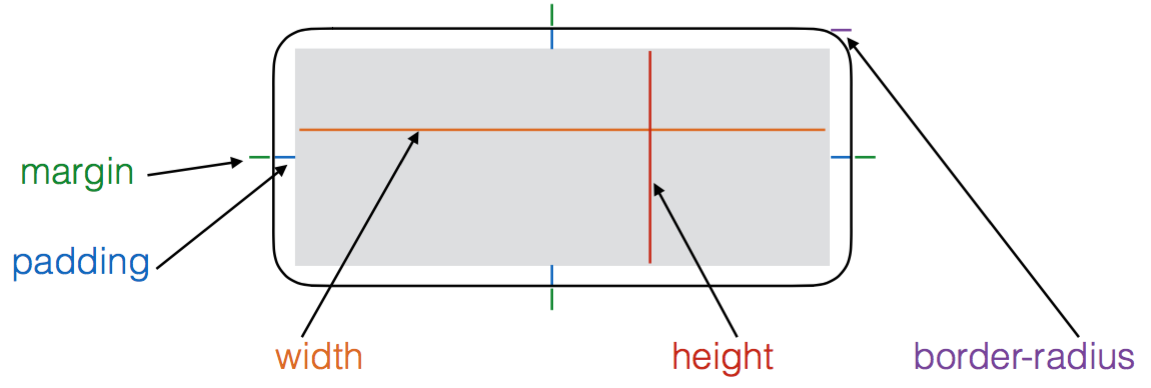
- Boxes, by default, are sized just large enough to fit their contents
- Sizes can be specified using
pxor%(%values are relative to the container dimensions) - Margin can be specified in clockwise order ([top][right][bottom][left])
- Border can include [width][style][color].
Centering content
- Must first ensure that element is narrower than container
- By default,element will expand to fill entire container
- Thus, the width of an element must be explicitly set
- Use
autovalue for left and right to create equal gaps
.centered {
   width: 300px;
   margin: 10px auto 10px auto;      /* auto set margin for right and left */
   border: 2px solid #0088dd;
}
Visibility and layout
display: inline;
display: block;
To cause element to not be laid out or take up any space (very useful for content that is dynamically added or removed)
display: none;
To cause boxes to be invisible, but still take up space
visibility: hidden;
Example
<ul>
   <li>Home</li>
   <li>Products</li>
   <li class="coming-soon">Services</li>
   <li>About</li>
   <li>Contact</li>
</ul>
li {
   display: inline;
   margin-right: 10px;
}
li.coming-soon {
   display: none;
}
This produces
Home Products About Contact
li {
   display: inline;
   margin-right: 10px;
}
li.coming-soon {
   visibility: hidden;
}
This produces
Home Products About Contact
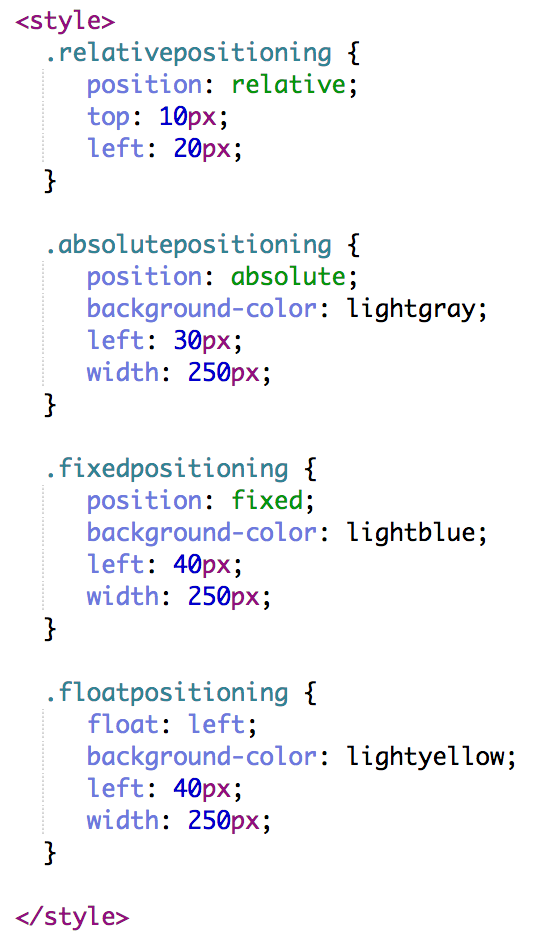
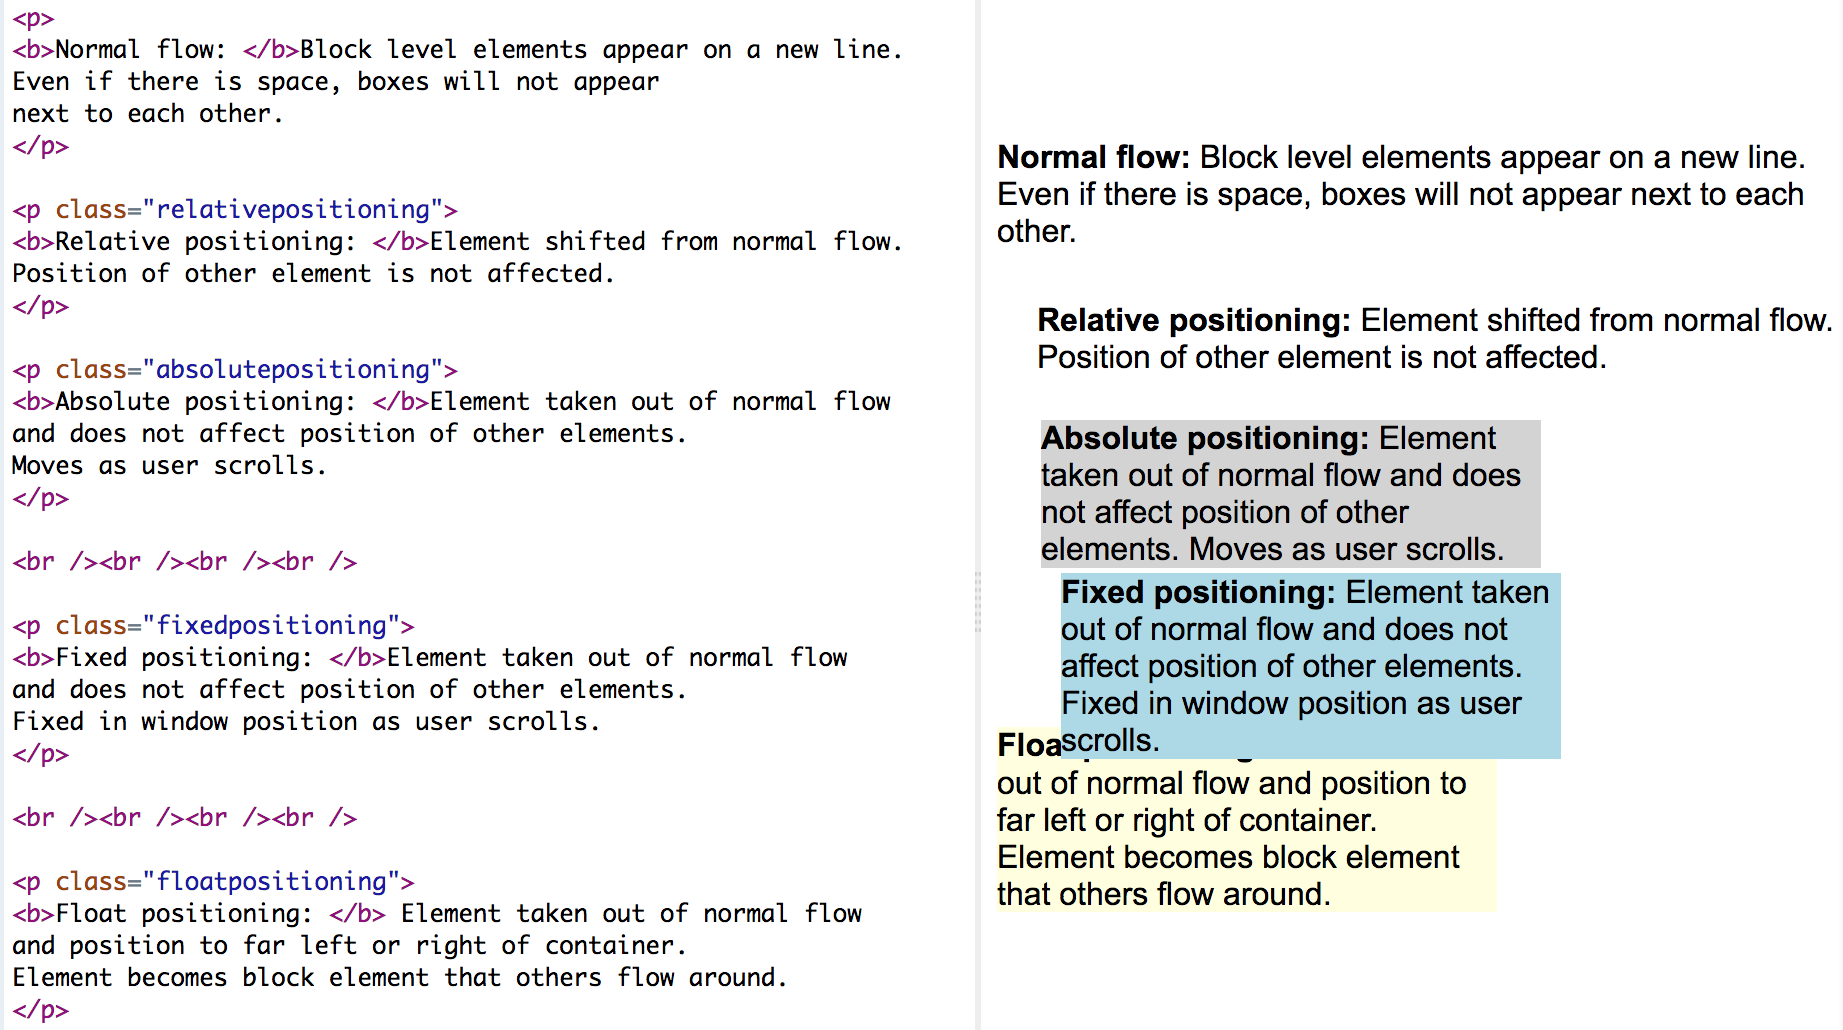
Positioning schemes
- Normal flow (default)
- Relative positioning
- Absolute positioning
- Fixed positioning
- Float positioning
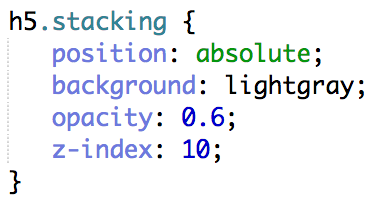
Stacking elements

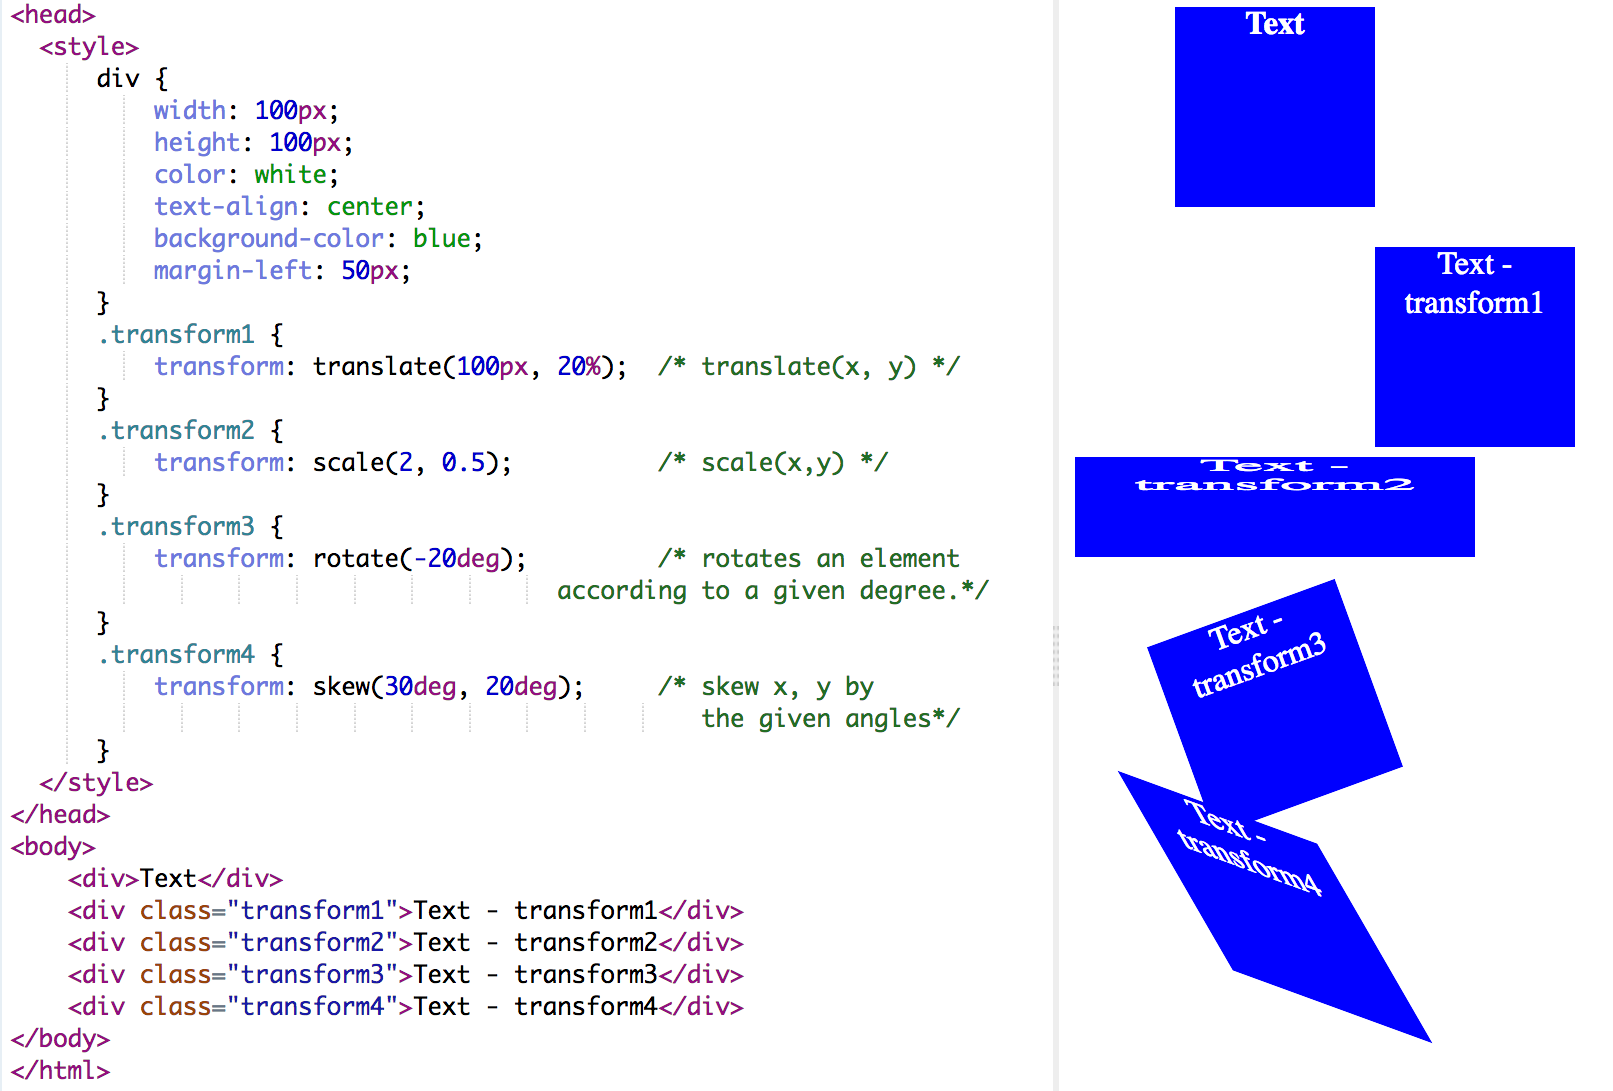
Transform
Transitions
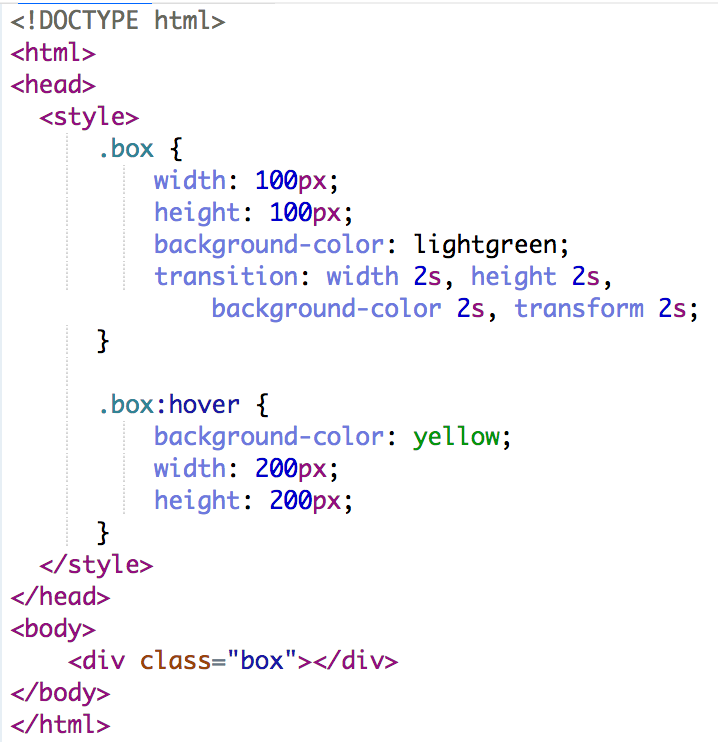
Hover over the div element below, to see the transition effect.
Additional styling
<style type="text/css">
   .spanred {
      font-size: 1.5em;
      color: red;
      font-weight: bold;
   }
</style>
...
<p>
   Homework is due <span class="spanred">before class</span> on the day it is due.
</p>
Homework is due before class on the day it is due.
<div> tag: specify style/presentation for a section/division of a document
<style type="text/css">
   .primary {
      font-size: 1.5em;
      color: purple;
      font-weight: bold;
   }
</style>
...
<p>This is some text.</p>
<div class="primary">
      <h3>This is a heading in a div element</h3>
      <p>This is some text in a div element.</p>
</div>
<p>This is some text.</p>
This is some text.
This is a heading in a div element
This is some text in a div element.
This is some text.
Conflict Resolution
  /* cstyle.css – an external style sheet for use with cascade.html */
   p { font-size: 0.8em; }
<!doctype html>
<!-- cascade.html -->
<html lang ="en">
   <head>
      <title> Style sheet levels </title>
      ...
      <link rel="stylesheet" type="text/css" href="cstyle.css" />

    <style type="text/css">
            p.docstyle { font-size: 1.2em; }
    </style>   </head>
   <body>
      <p>
         Now is the time
      </p>
      <p class="docstyle">
         for all good men
      </p>
          <p class="docstyle" style="font-size:1.6em">
       to come to the aid
    </p>   </body>
</html>
Cascade rules
- Id is more specific than class; class is more specific than element
- The longer the selector, the more specific it is
- The more specific rule wins
- If style rules are equally specific, the last one wins
#id1 #id2 h1 {color: red; }
#id1 #id2 h1 {color: green; }     /* winner */
#id1 h1 {color: blue; }
More examples
| Assignment | Due |
|---|---|
| Assignment 6 | 04/12 |
| Assignment 7 | 05/01 |
"Advice on submitting homework," by Professor Jeff Offutt. Although the professor will usually make an honest attempt to grade the homework completely objectively and solely on the basis of content, unfortunately, most homeworks require some judgement to evaluate. This means that the presentation of your homework can have a significant impact on the amount of time needed to grade, and ultimately, on your grade that you receive. Thus it is to your advantage, as well as your professor's, for you to do your best to make your homework not only correct, but easy to grade.
 CC-BY-NC-SA 4.0