Database setup on Google Cloud Platform
(Please tell me if you find any errors or omissions in the document —Upsorn Praphamontripong, 30-May-2022)
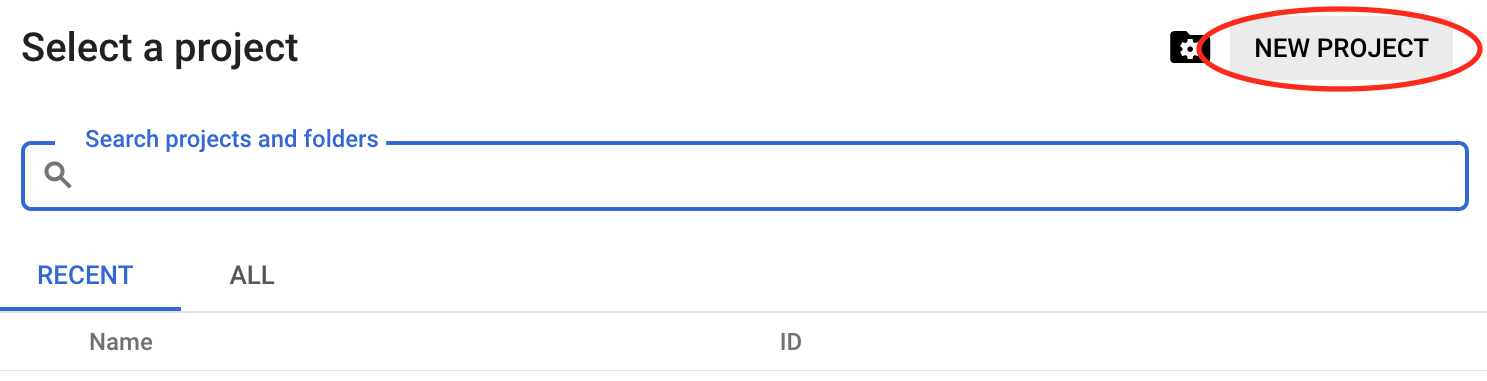
Create a new project
Redeem and use your Google coupon. Do not enter your credit card. (If you have not received an email with the link to redeem a coupon, please notify the course instructor via email.)
- Assuming that you already have a Google account. Go to the Google Cloud Console and login to your account
- Click the "Select a project" dropdown icon (next to "Google Cloud Platform")

- Select New Project
This will prompt a screen allowing you to create a new project. Enter your Project Name (e.g.,
webPL), be sure the Billing account is associated with the Google coupon you redeemed. Then, click CREATE.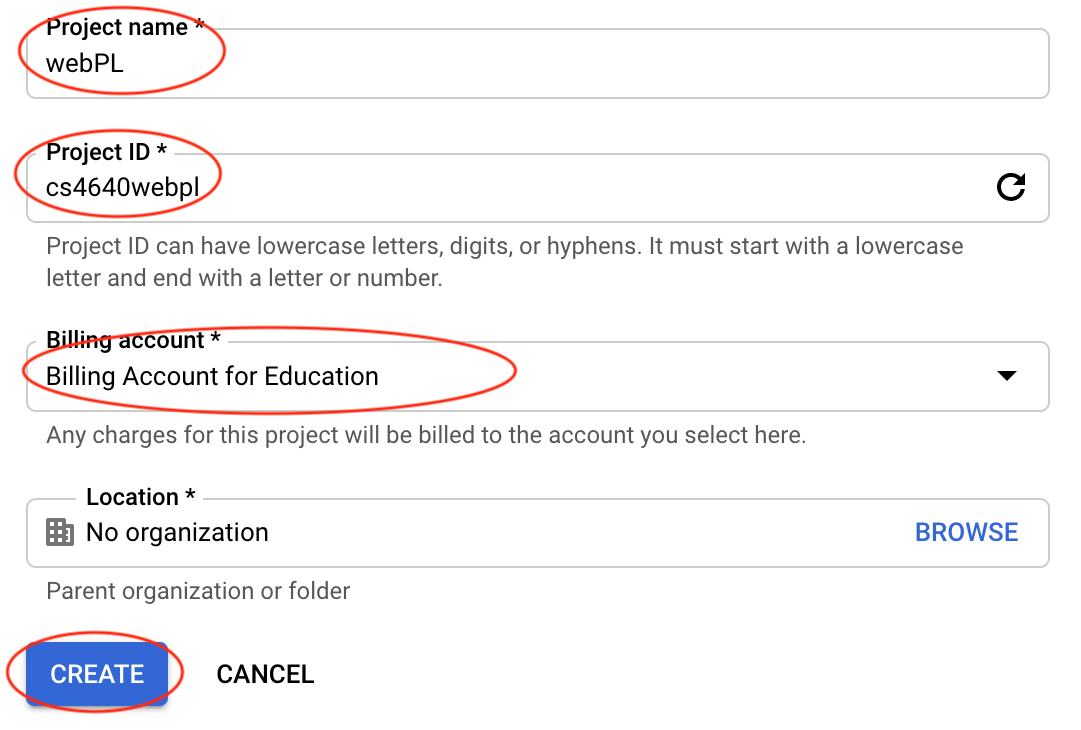
Note: depending on how your account was set, you may be required to enter Location or Organization. Please select University of Virginia and proceed to create the project.
Create SQL instance
- Access the project you just created
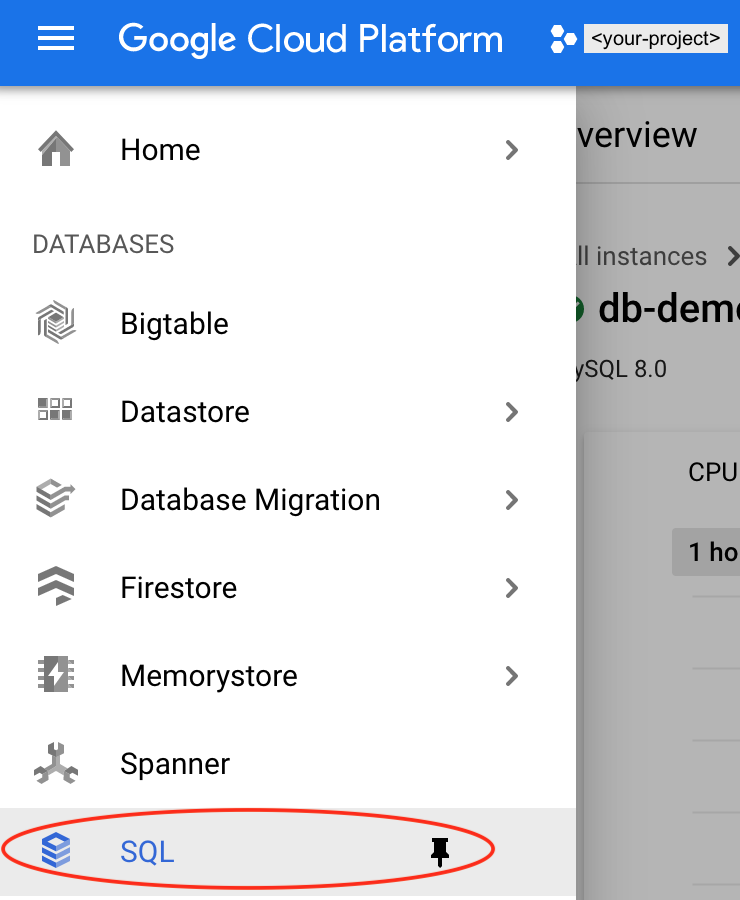
- Click the Navigation Menus (a "hamburger menu" icon, top left of the screen),
then select SQL
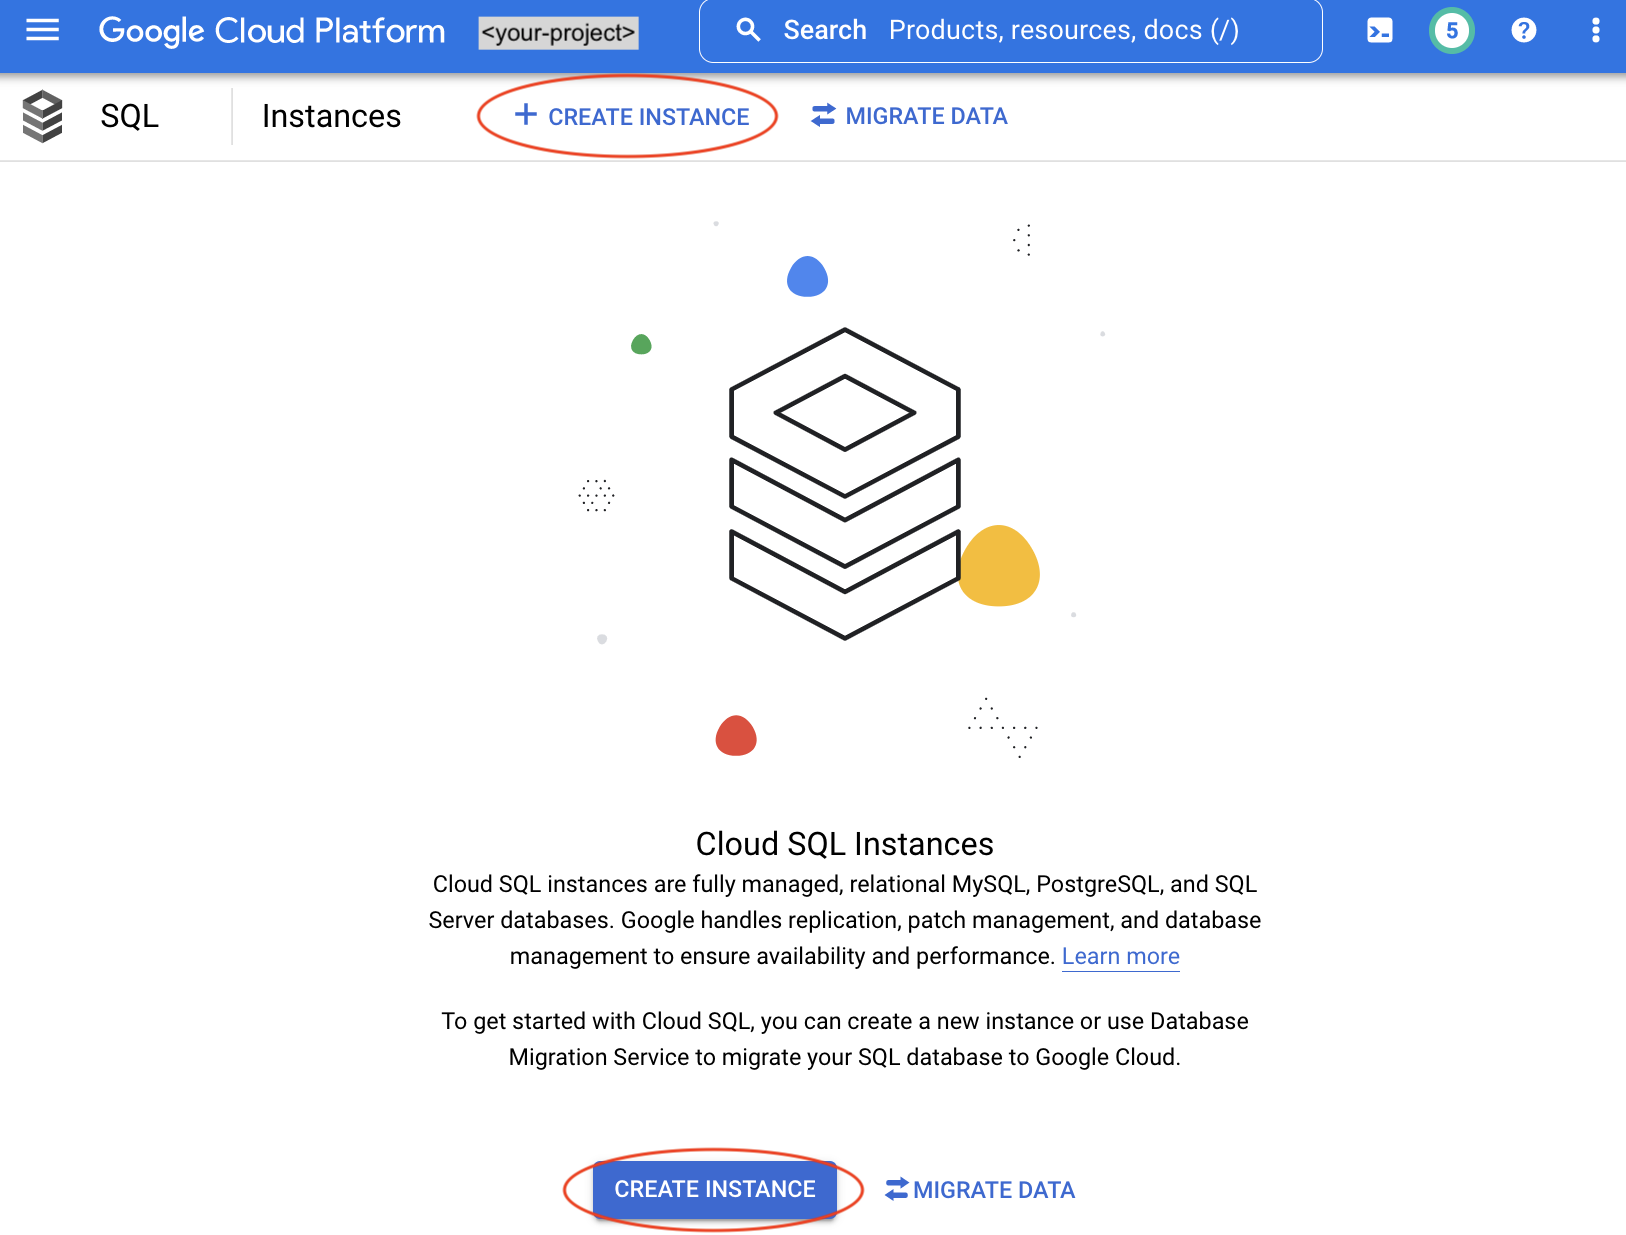
- Click CREATE INSTANCE to create a cloud SQL instance
- Choose MySQL database engine
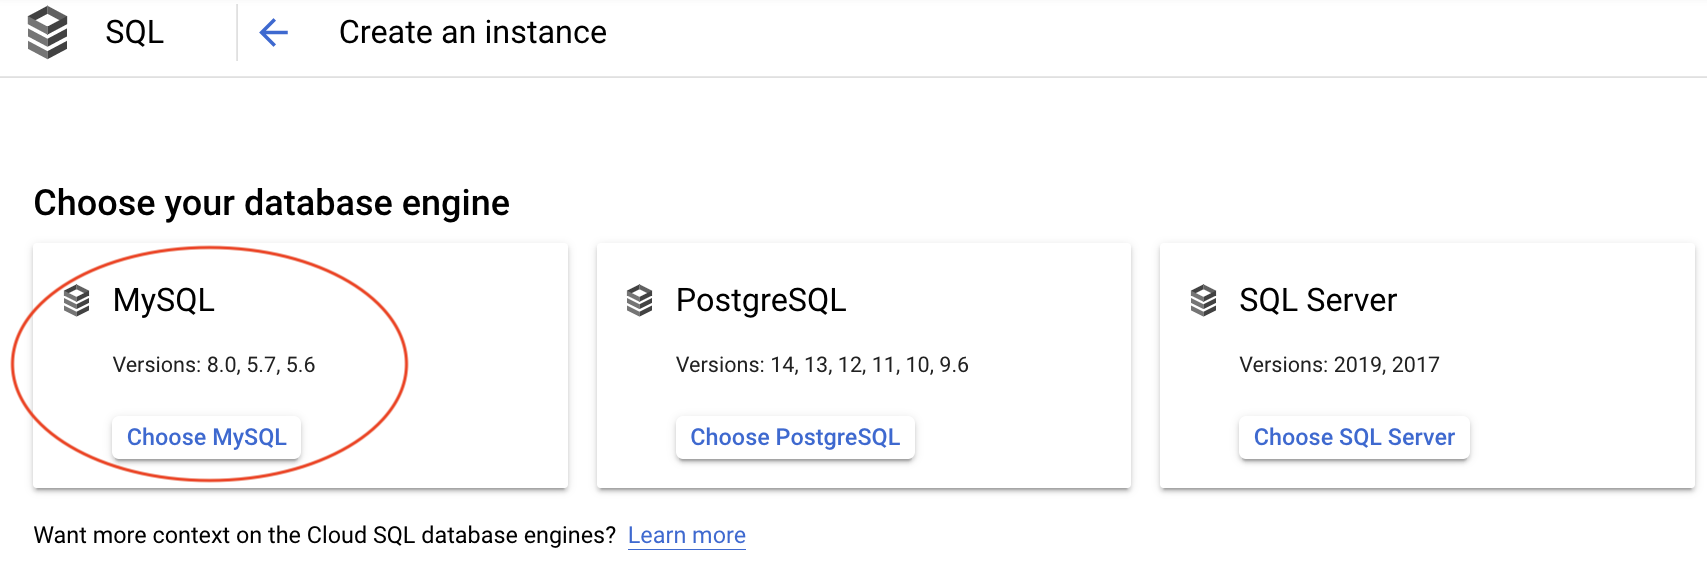
- Enable Compute Engine API if this is the first time you create a SQL instance

- Enter the instance info. Choose us-east4 for a region;
Any for a zone; and MySQL 8 for a database version.
Be sure to remember the Root password. You will need this when connecting to the instance.

- Click the Create button.
It may take awhile for the instance to be created.
Once the instance has been created, on the SQL's Overview page, you should see a screen listing your instance.
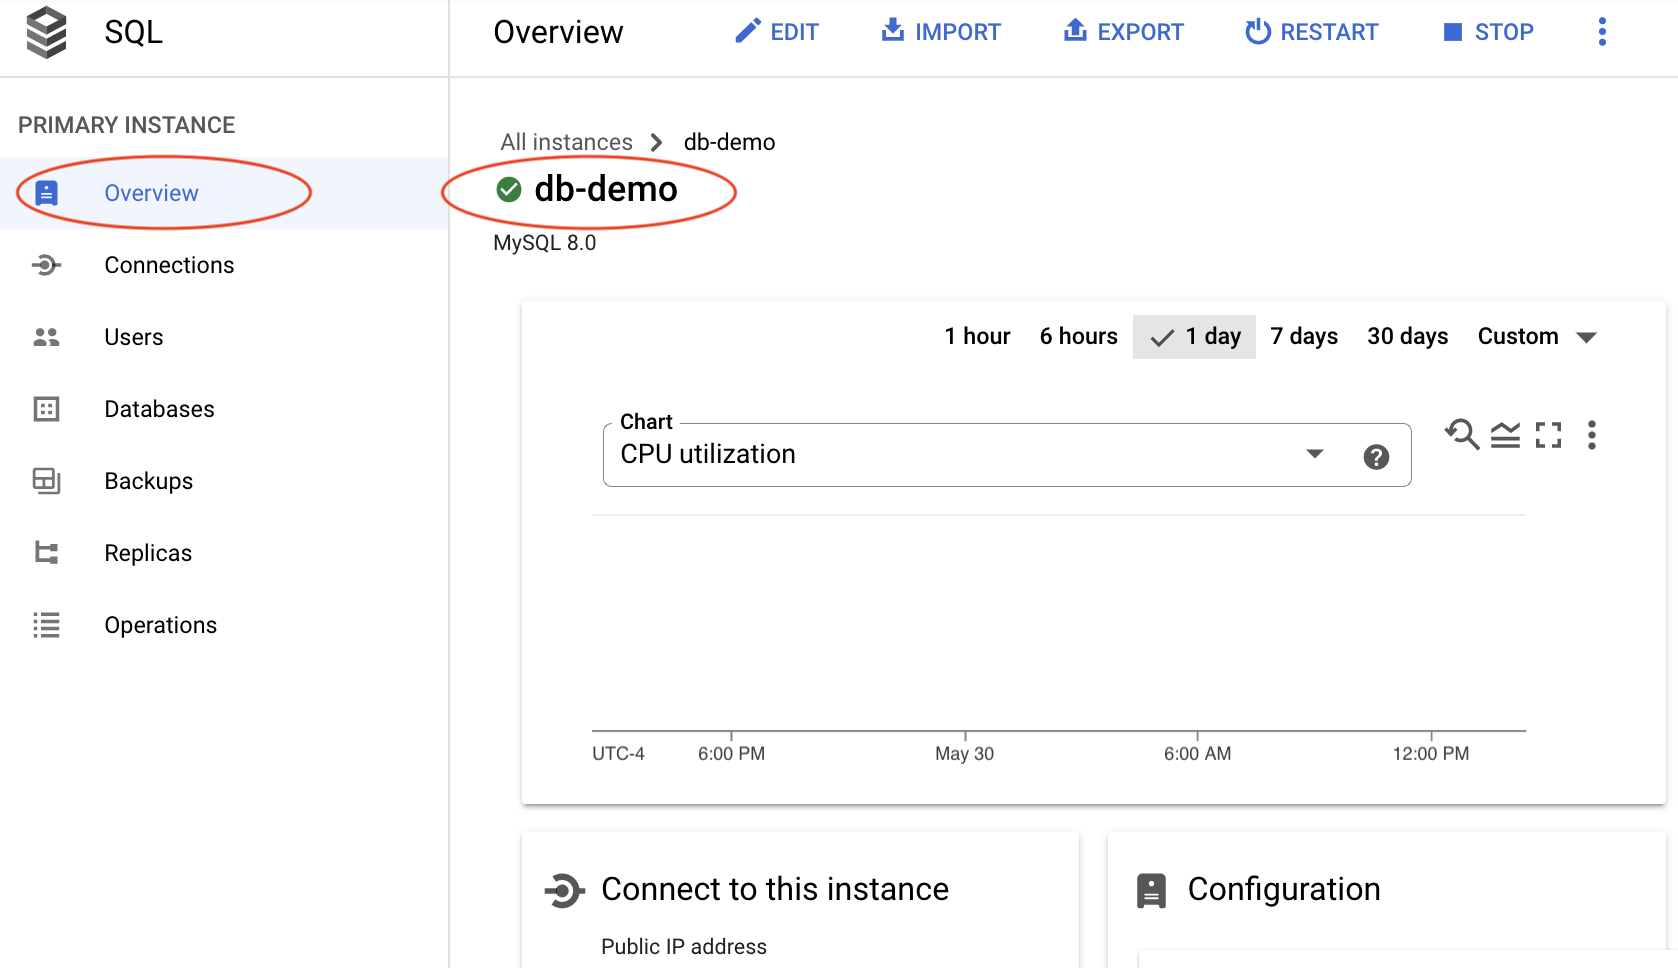
 indicates that the
SQL instance has been started.
indicates that the
SQL instance has been started.
 indicates that the
SQL instance has not been started.
indicates that the
SQL instance has not been started.
Start SQL instance
- On the screen listing your instance(s), click the instance (for example, db-demo)
- On the instance overview screen,
click one of the START buttons.
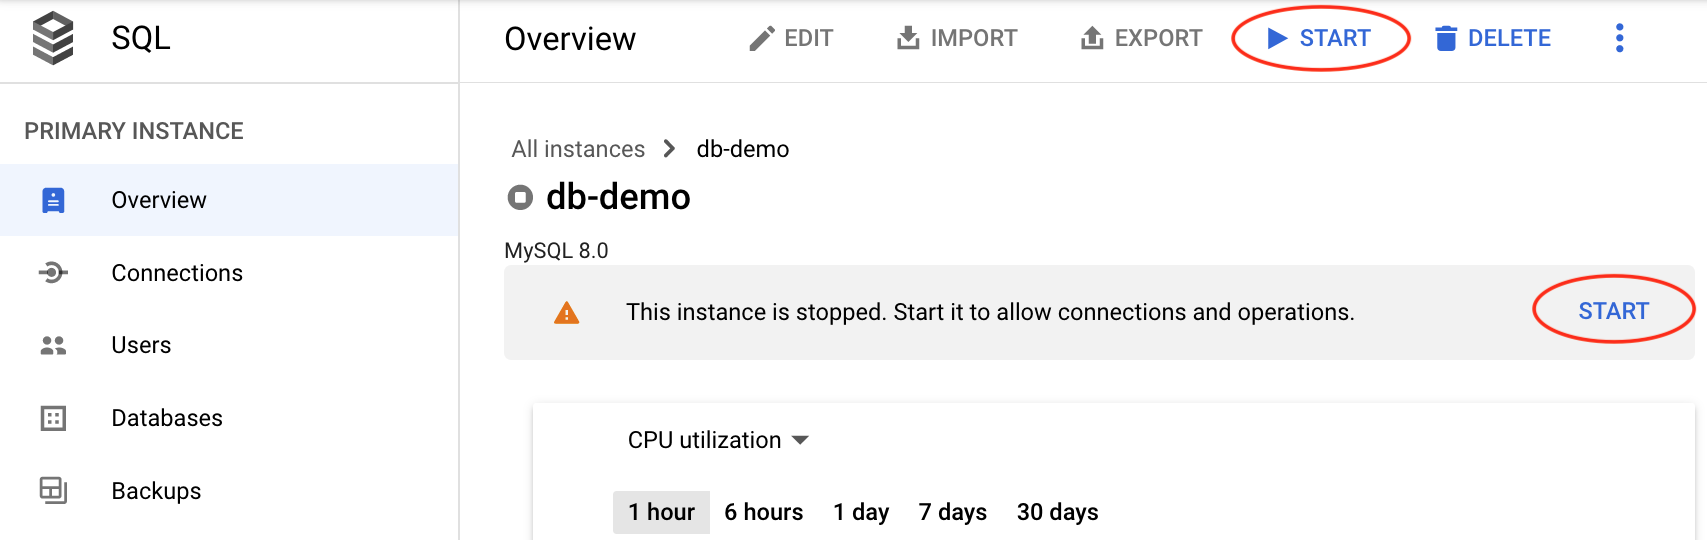
The SQL instance must be started before databases can be created or SQL commands can be run.
Remember to stop the SQL instance when not in use.
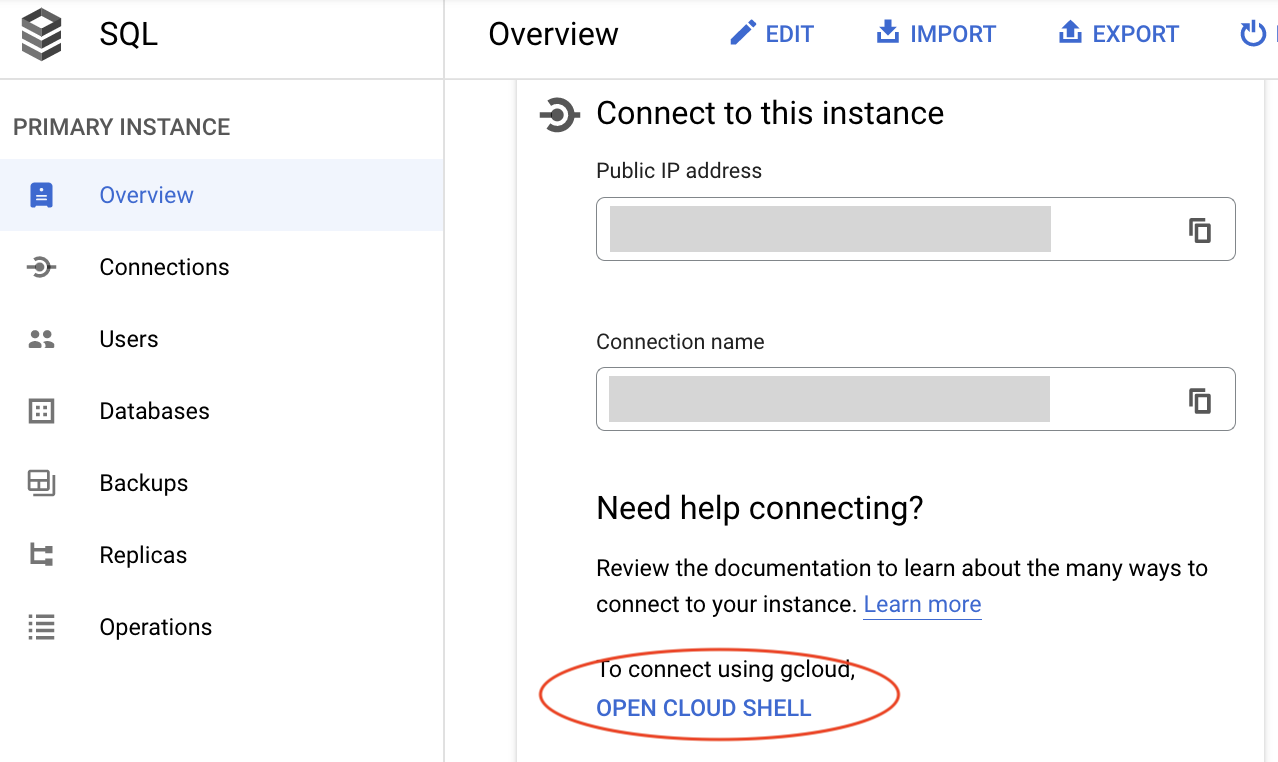
Connect to SQL instance
There are several ways to connect to a MySQL instance. In this quick introduction, we will use GCP cloud shell.
- Start the SQL instance
- On the instance overview screen,
under Connect to this instance section,
select Open Cloud Shell
-
Once the Cloud Shell has been activated, you should see a screen similar to the following.
Press the enter key to run the command
gcloud sql connect <your-instance-ID> --user=root --quiet
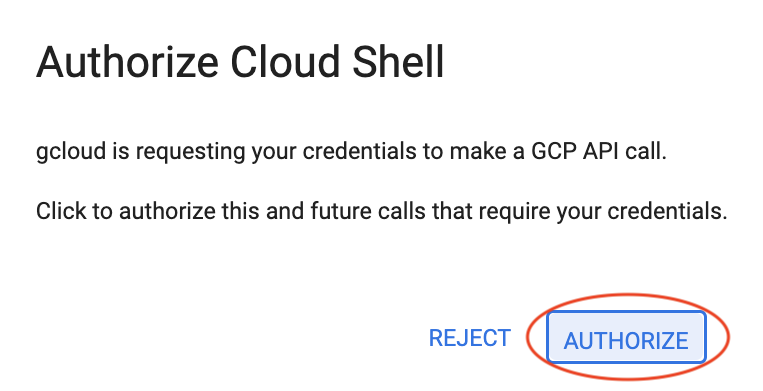
You may be asked to authorize cloud shell.
If you receive an error Your current active account [ACCOUNT] does not have any valid credentials,
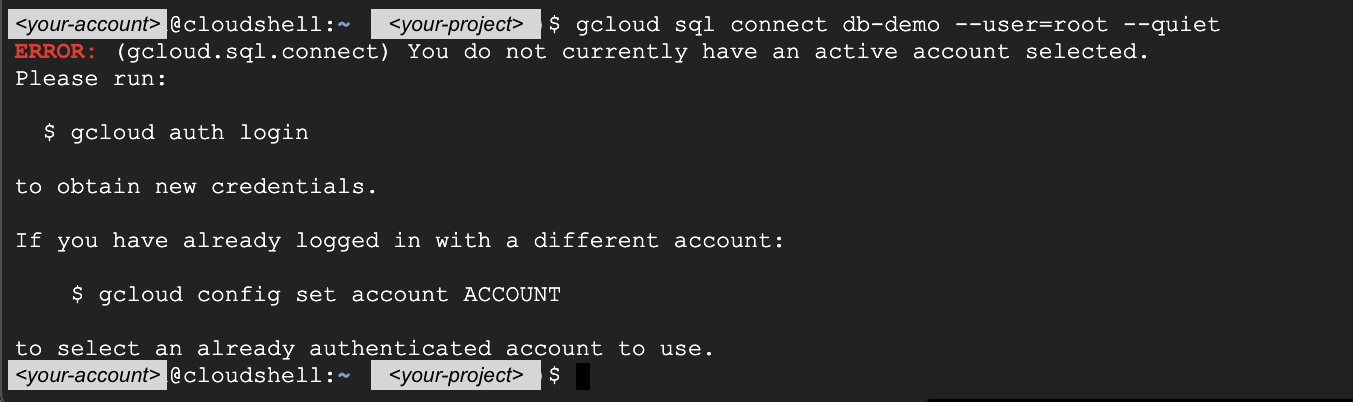
you need to activate your account by running the command
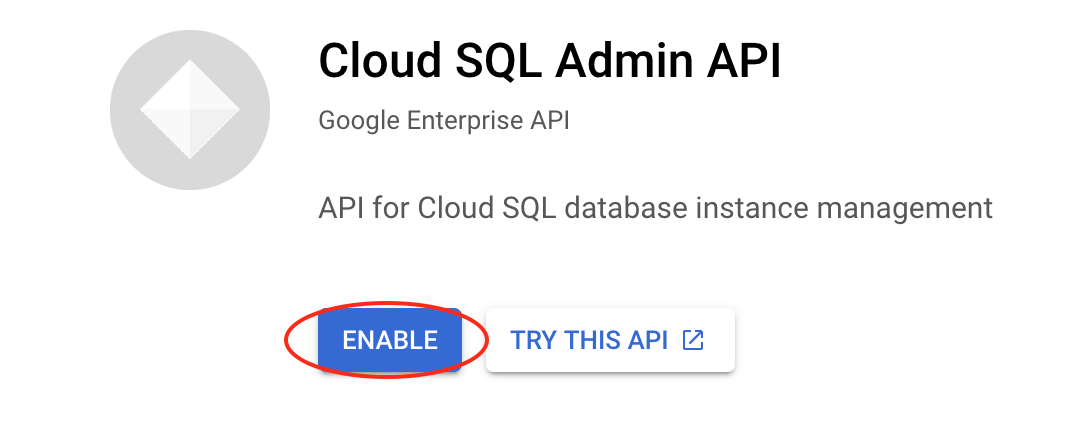
gcloud config set account <your-GCP-account>.If you receive a permission denied error, click the link specified in Cloud Shell to enable Cloud SQL Admin API.

Then, try running
gcloud sql connect <your-instance-ID> --user=root --quietagain. -
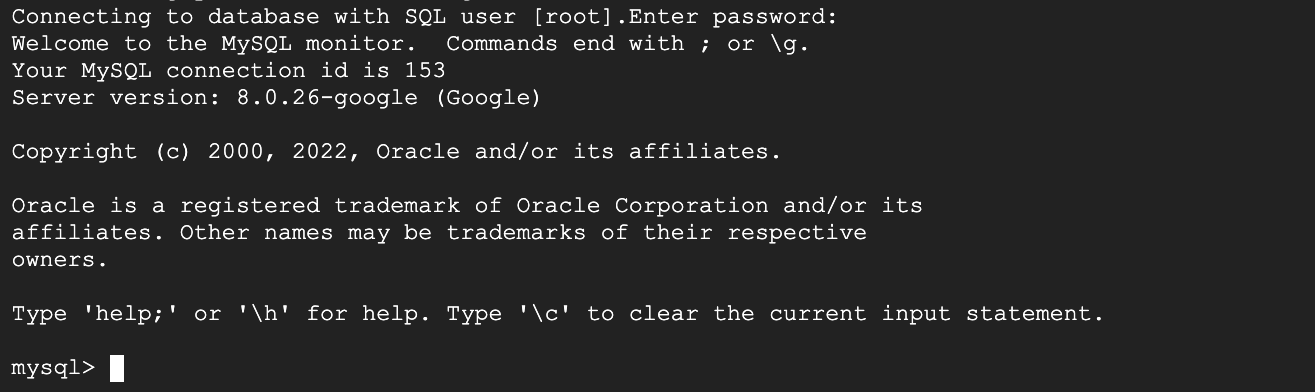
Enter your root password and then press enter
Once the connection has been established, you should see the mysql> prompt.
Create a database
Let's create a guestbook database. To create a database, there are several options.
You may use the Create database feature of Google Cloud Console.- Start the SQL instance
- On the instance overview screen, select Databases
-
click the Create database button
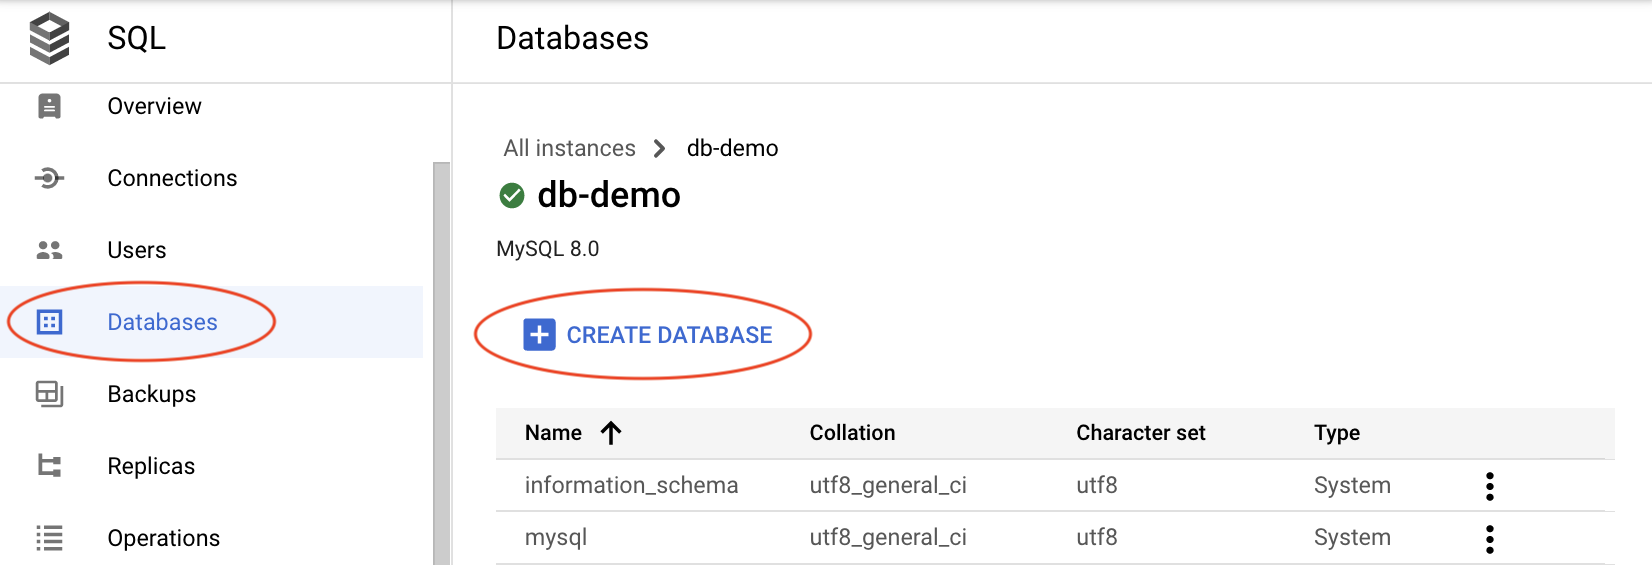
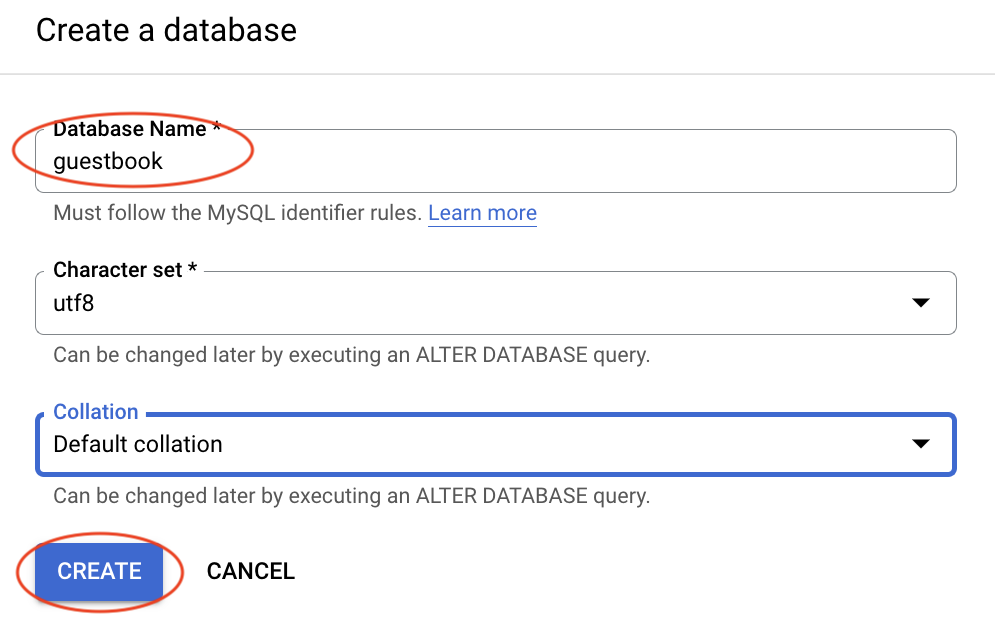
-
Enter a database name,
select utf8 for the Character set,
and then click the CREATE button
Once a database has been created, you should see a screen listing your database.
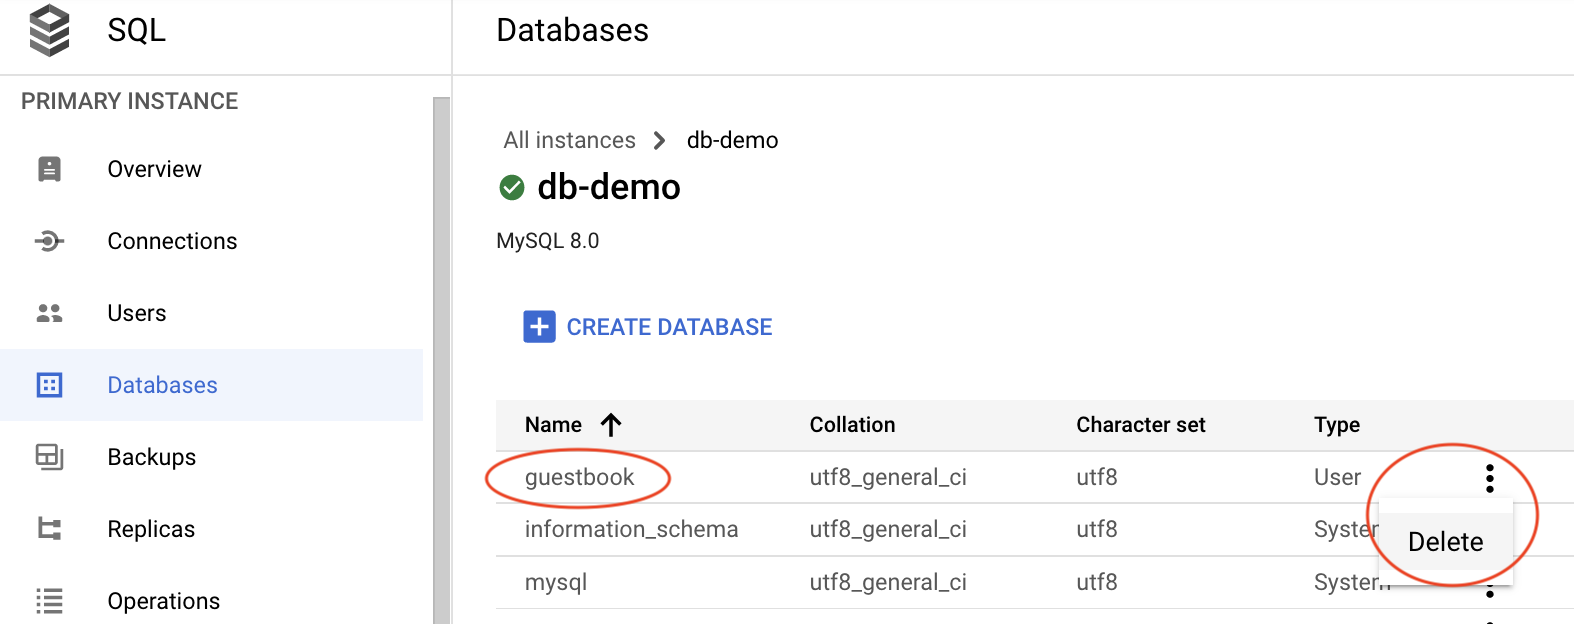
To delete a database, click the three-vertical-dots option, then select Delete
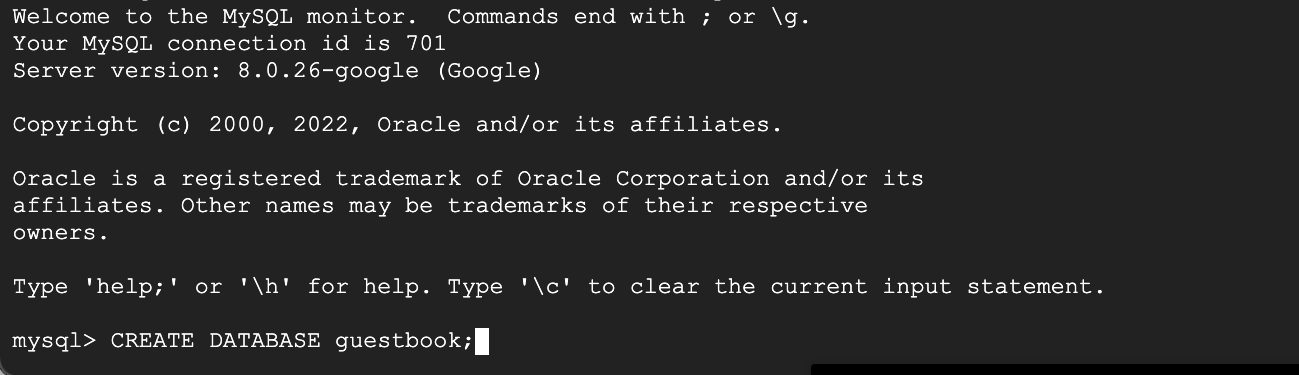
You may run a SQL command to create a database.
- Start the SQL instance
- Connect to the instance using GCP cloud shell
- Run the command
CREATE DATABASE guestbook;Note: SQL commands are not case sensitive. This example uses uppercase and lowercase simply to make it easy to read.
Create a table
There are several ways to create a table. In this quick introduction, we will use GCP cloud shell.
- Start the SQL instance
- Connect to the instance using GCP cloud shell
- Let's use a guestbook database,
create a table named entries,
which contains 3 columns.
Enter the following code
USE guestbook;
CREATE TABLE entries (guestName VARCHAR(255), content VARCHAR(255),
    entryID INT NOT NULL AUTO_INCREMENT, PRIMARY KEY(entryID));
You may run
DESC entries;to view the table schema (structure).
Insert data
There are several ways to insert data into a table. In this quick introduction, we will use GCP cloud shell.
- Start the SQL instance
- Connect to the instance using GCP cloud shell
- Enter the following code to specify the database to be used
USE guestbook;
Note: if you have previously specified the database, no need to include this code.
- Enter the following code
INSERT INTO entries (guestName, content) values ("Humpty", "Humpty's here!");
INSERT INTO entries (guestName, content) values ("Dumpty", "Dumpty's here too!");
Retrieve data
There are several ways to retrieve data from a table. In this quick introduction, we will use GCP cloud shell.
- Start the SQL instance
- Connect to the instance using GCP cloud shell
- Enter the following code to specify the database to be used
USE guestbook;
Note: if you have previously specified the database, no need to include this code.
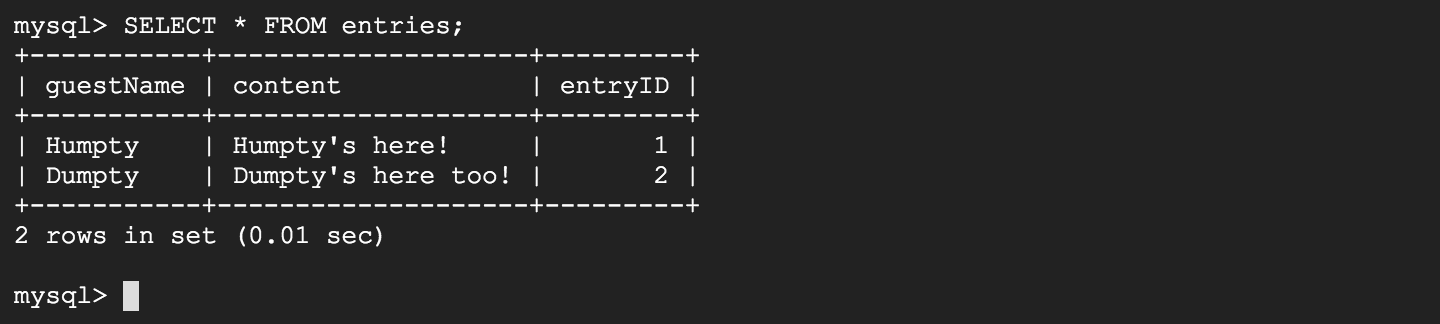
- Enter the following code
SELECT * FROM entries;
Exit Cloud Shell
To disconnect from the mysql terminal (monitor), run the exit command.
To disconnect from the Cloud Shell, run the exit command.

Import SQL file
- Create a blank file named friendbook.sql.
Paste the following content in the file
CREATE DATABASE friendbook; USE friendbook; CREATE TABLE friends (friendName VARCHAR(255), phone VARCHAR(255), entryID INT NOT NULL AUTO_INCREMENT, PRIMARY KEY(entryID)); INSERT INTO friends (friendName, phone) values ("Humpty", "111-111-1111"); INSERT INTO friends (friendName, phone) values ("Dumpty", "222-222-2222"); - Assuming that you have already created a storage bucket under your GCP project.
If you have not created a storage bucket, please refer to Create GCP storage bucket.
Upload friendbook.sql to your GCP bucket
- Start the SQL instance
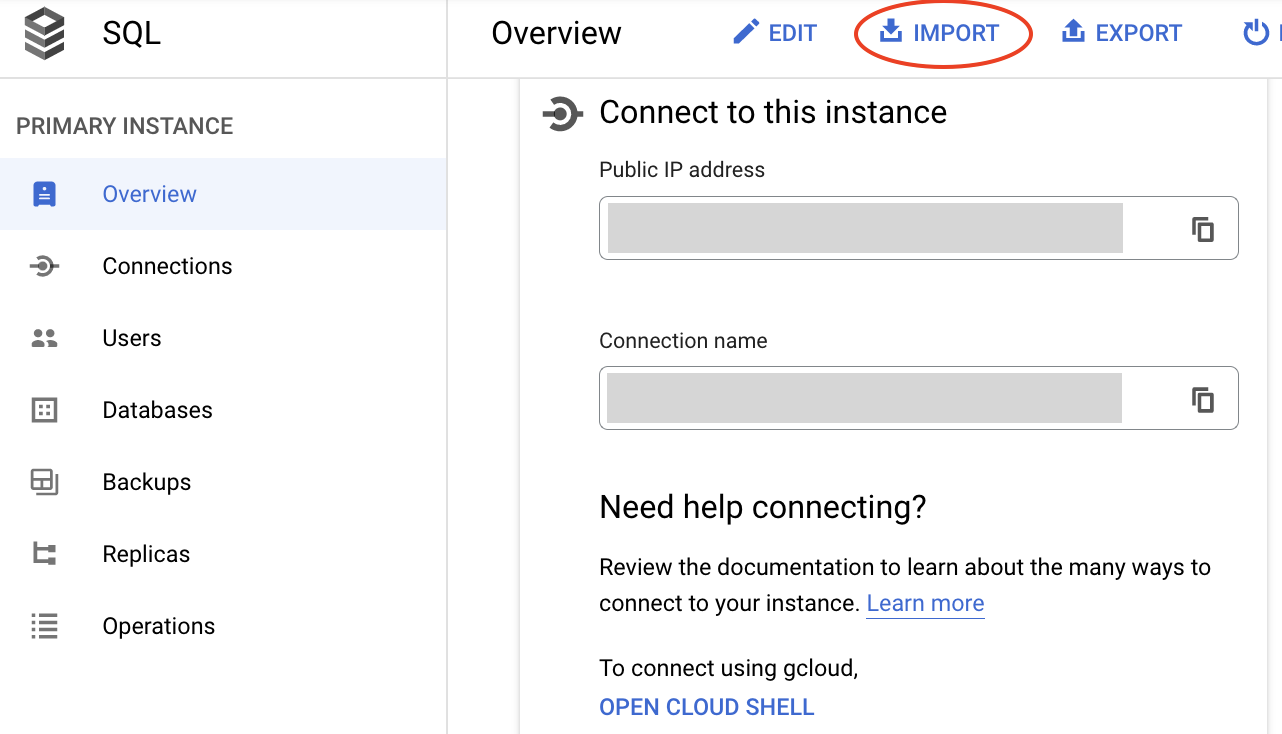
- Go to GCP console, on the SQL instance overview screen,
click the IMPORT option.
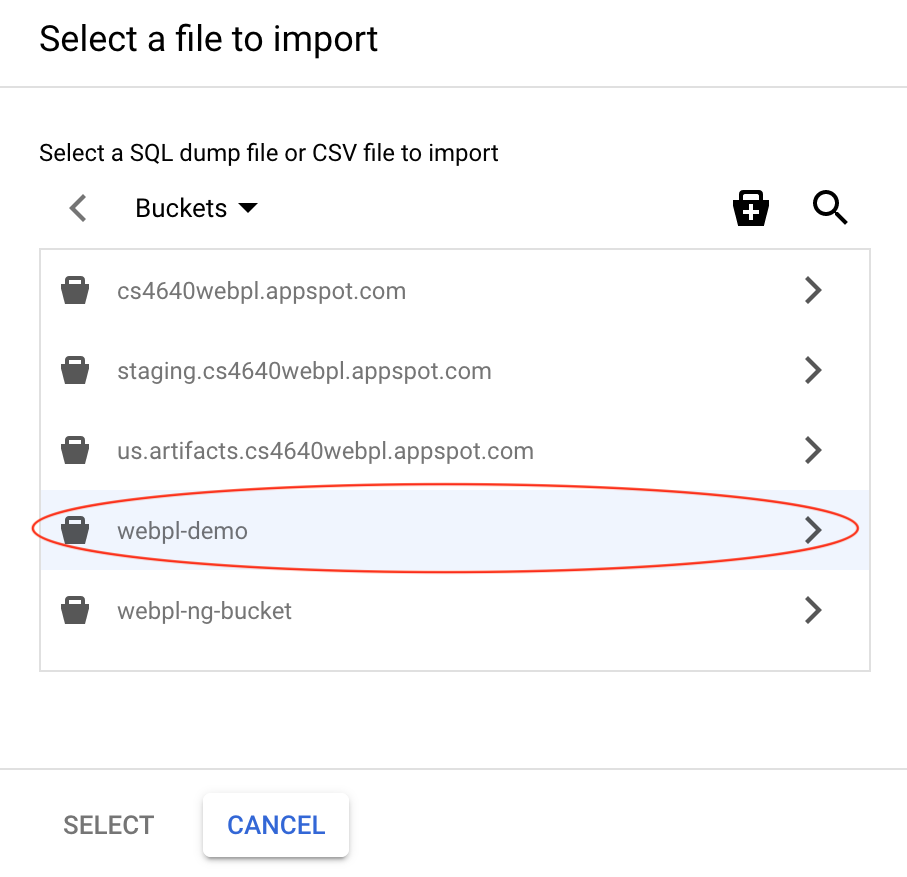
- Choose the file to import data from

You may need to click ">" to navigate to the desired file.
Assuming that your friendbook.sql file is in a bucket named webpl-demo.
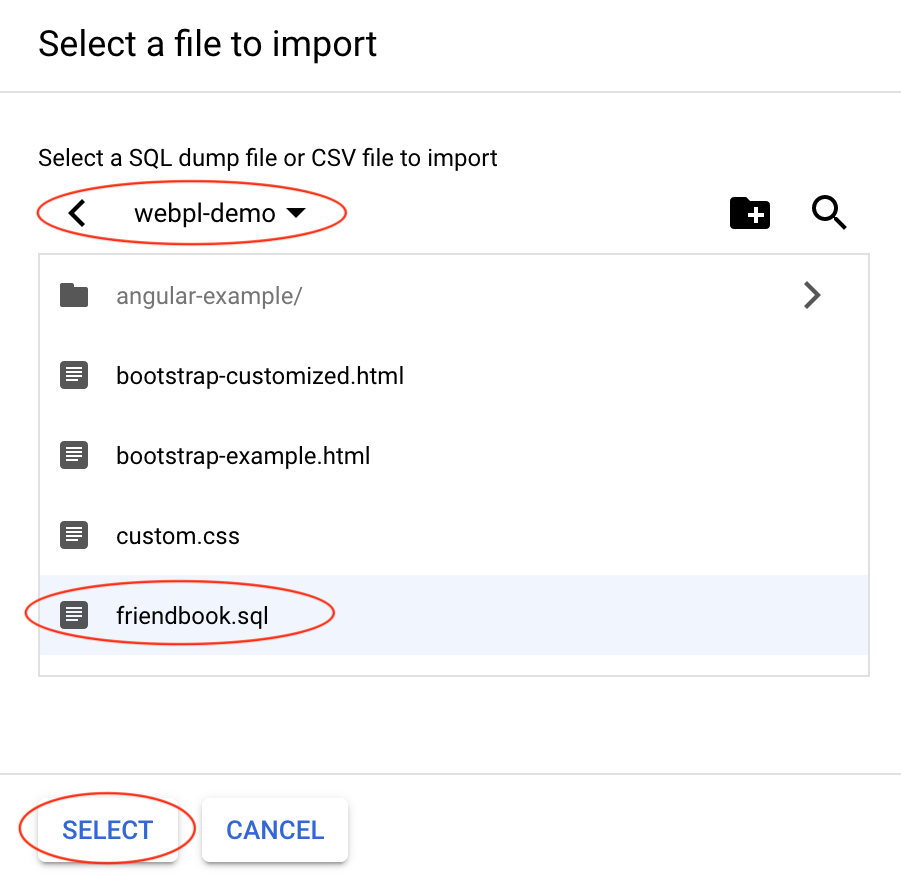
Then click the Select button.
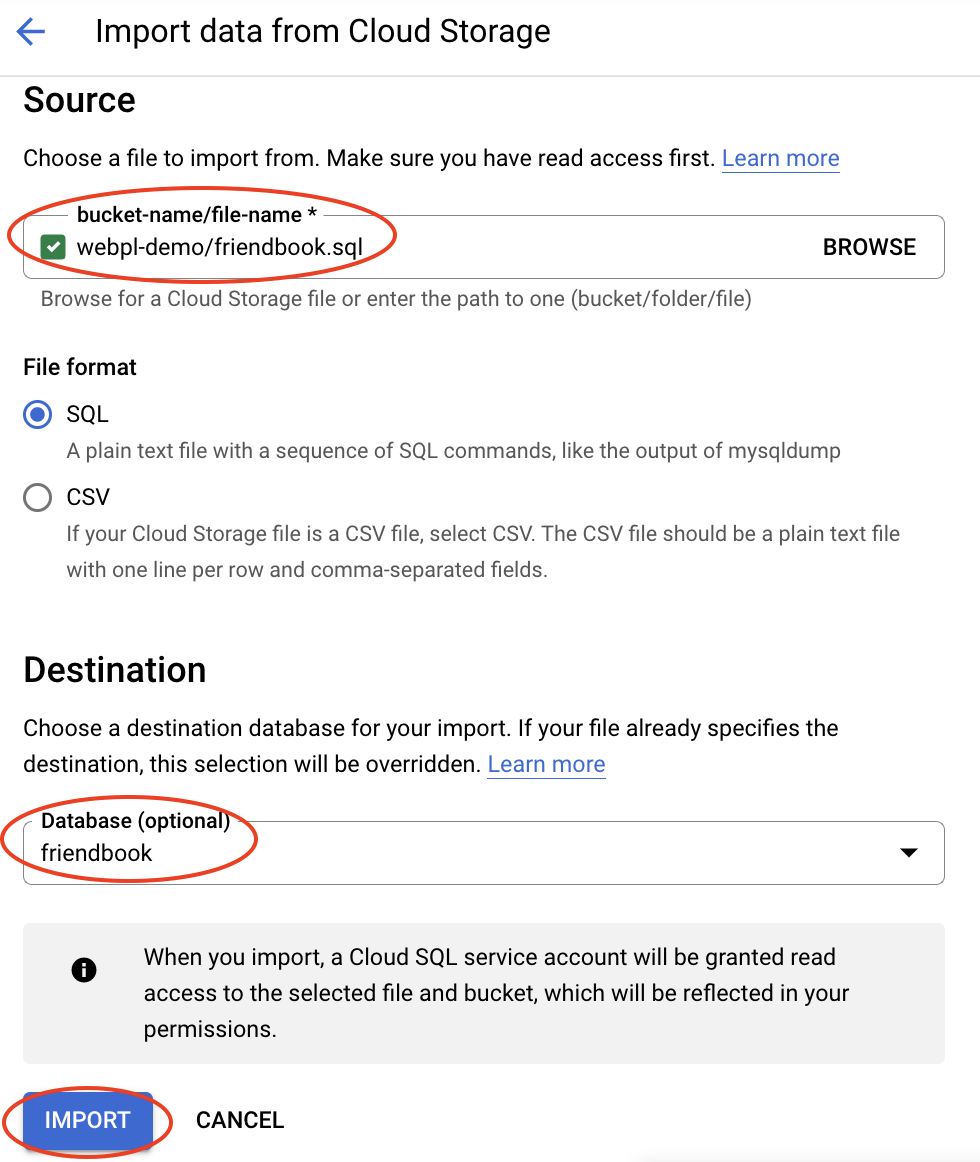
If you wish to execute a .sql on an existing database, select a destination database. Then, click Import.
To verify that your SQL file has been run successfully, connect to the instance using the Cloud Shell. Run the following code
USE friendbook;
SELECT * from friends;
You should see two records of data entered into your newly created friends table.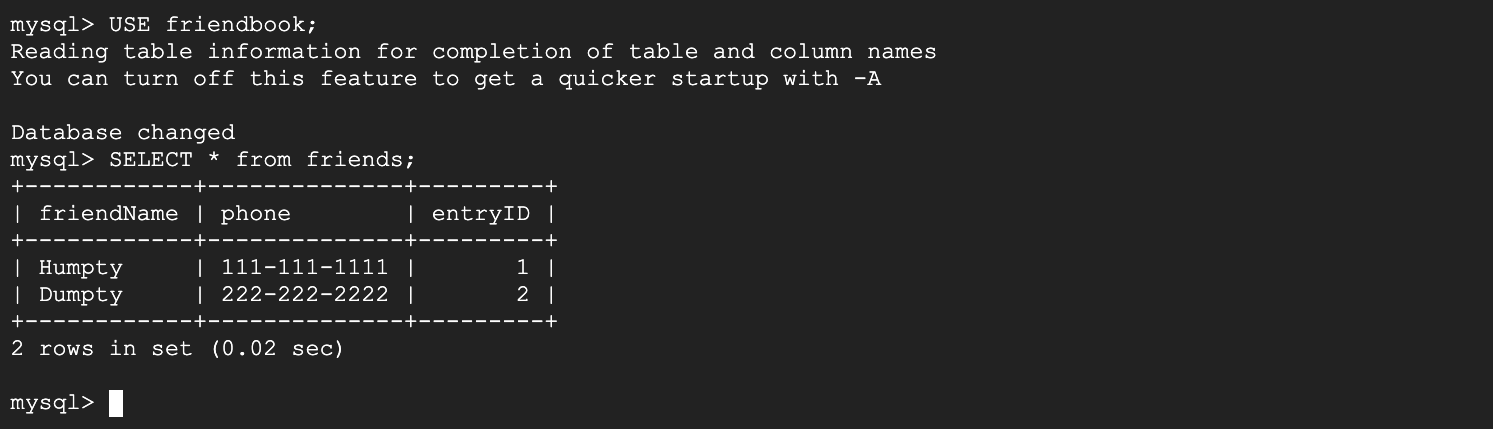
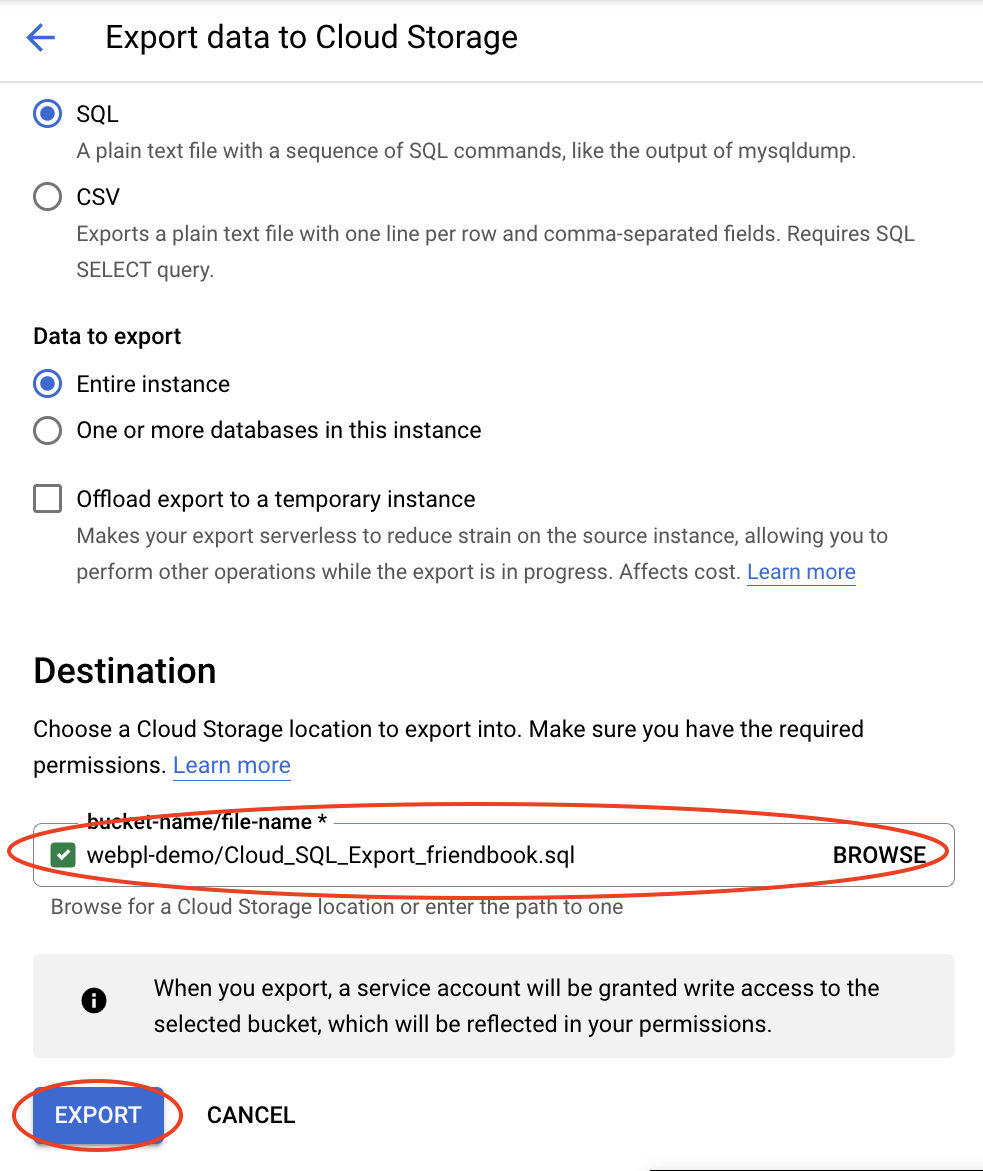
Export SQL file
- Assuming that you have already created a storage bucket under your GCP project.
If you have not created a storage bucket, please refer to Create GCP storage bucket.
- Start the SQL instance
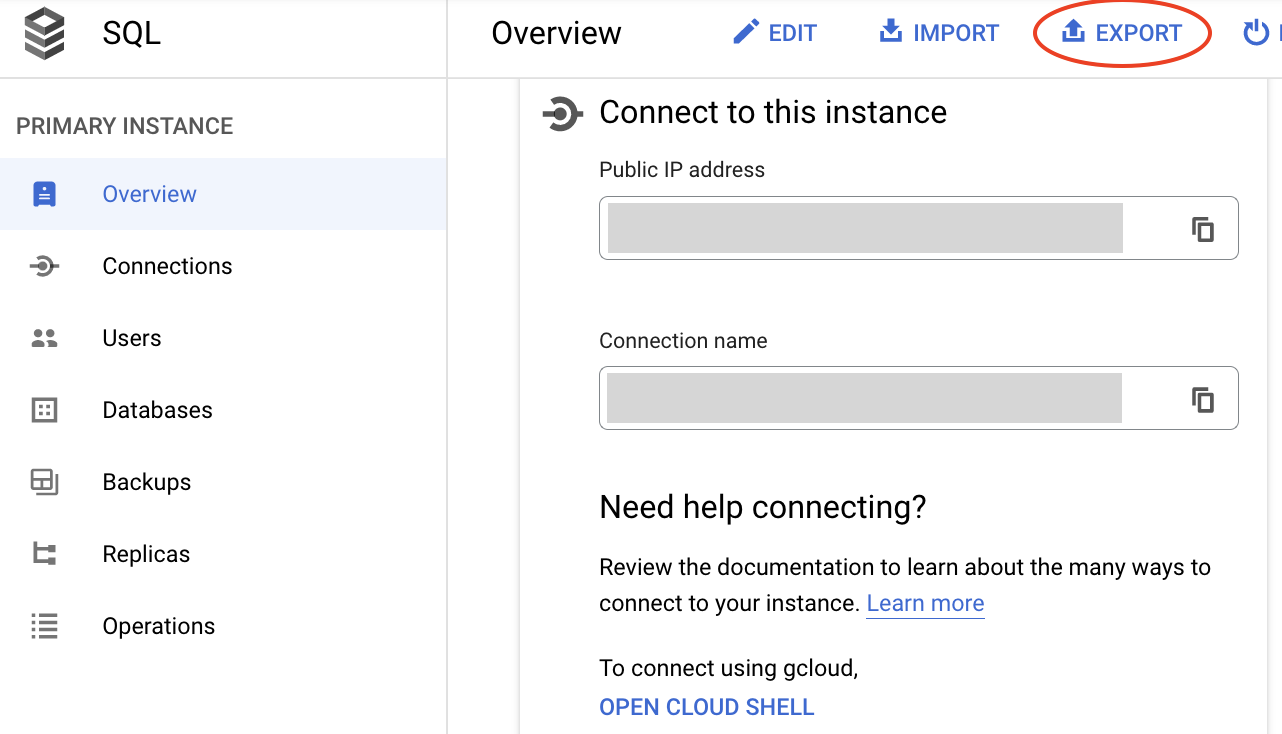
- Go to GCP console, on the SQL instance overview screen,
click the EXPORT option.
- Specify the destination where the .sql file
will be exported to.
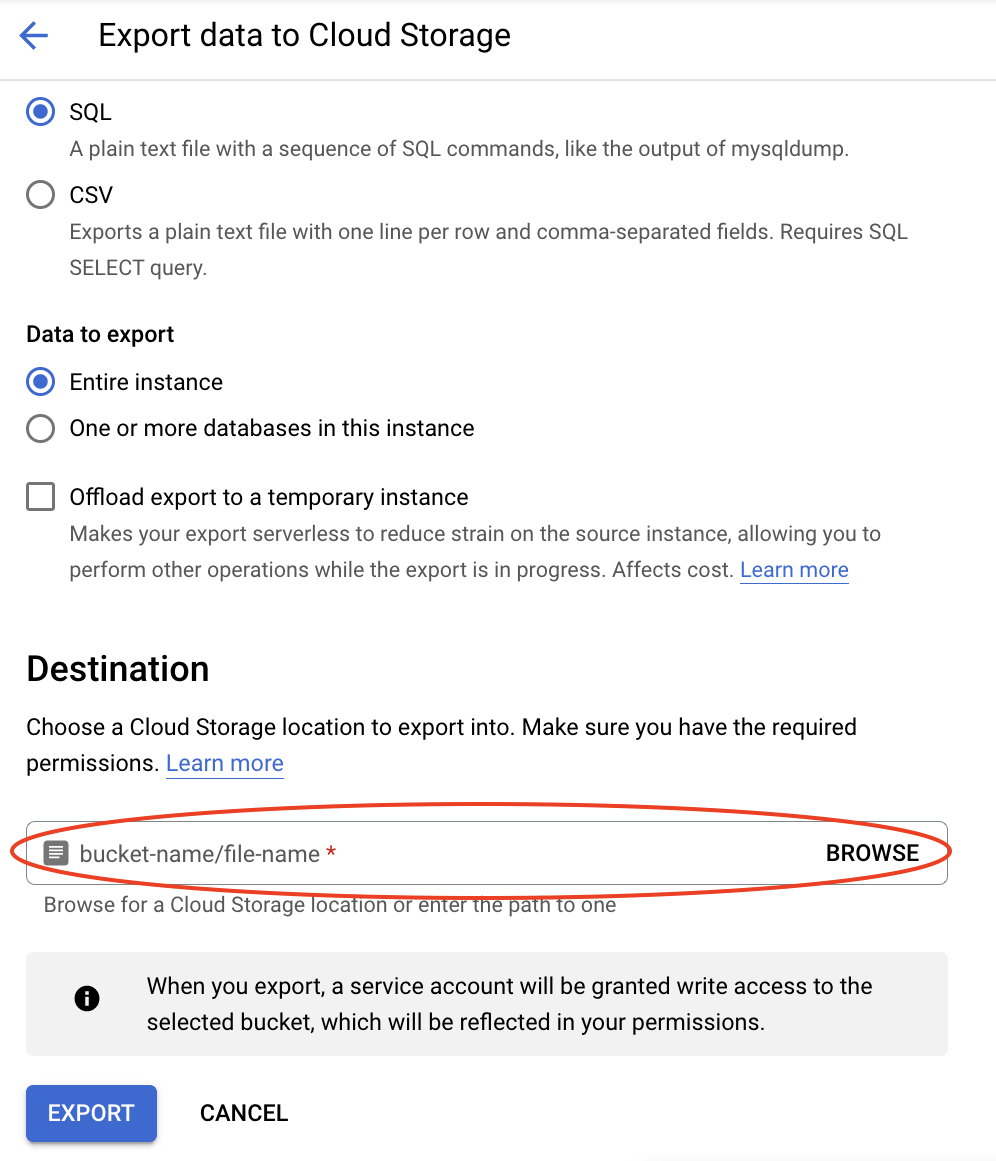
Assume the exported file will be called Cloud_SQL_Export-friendbook.sql and stored in webpl-demo bucket.
Click the Select button, and then Export.
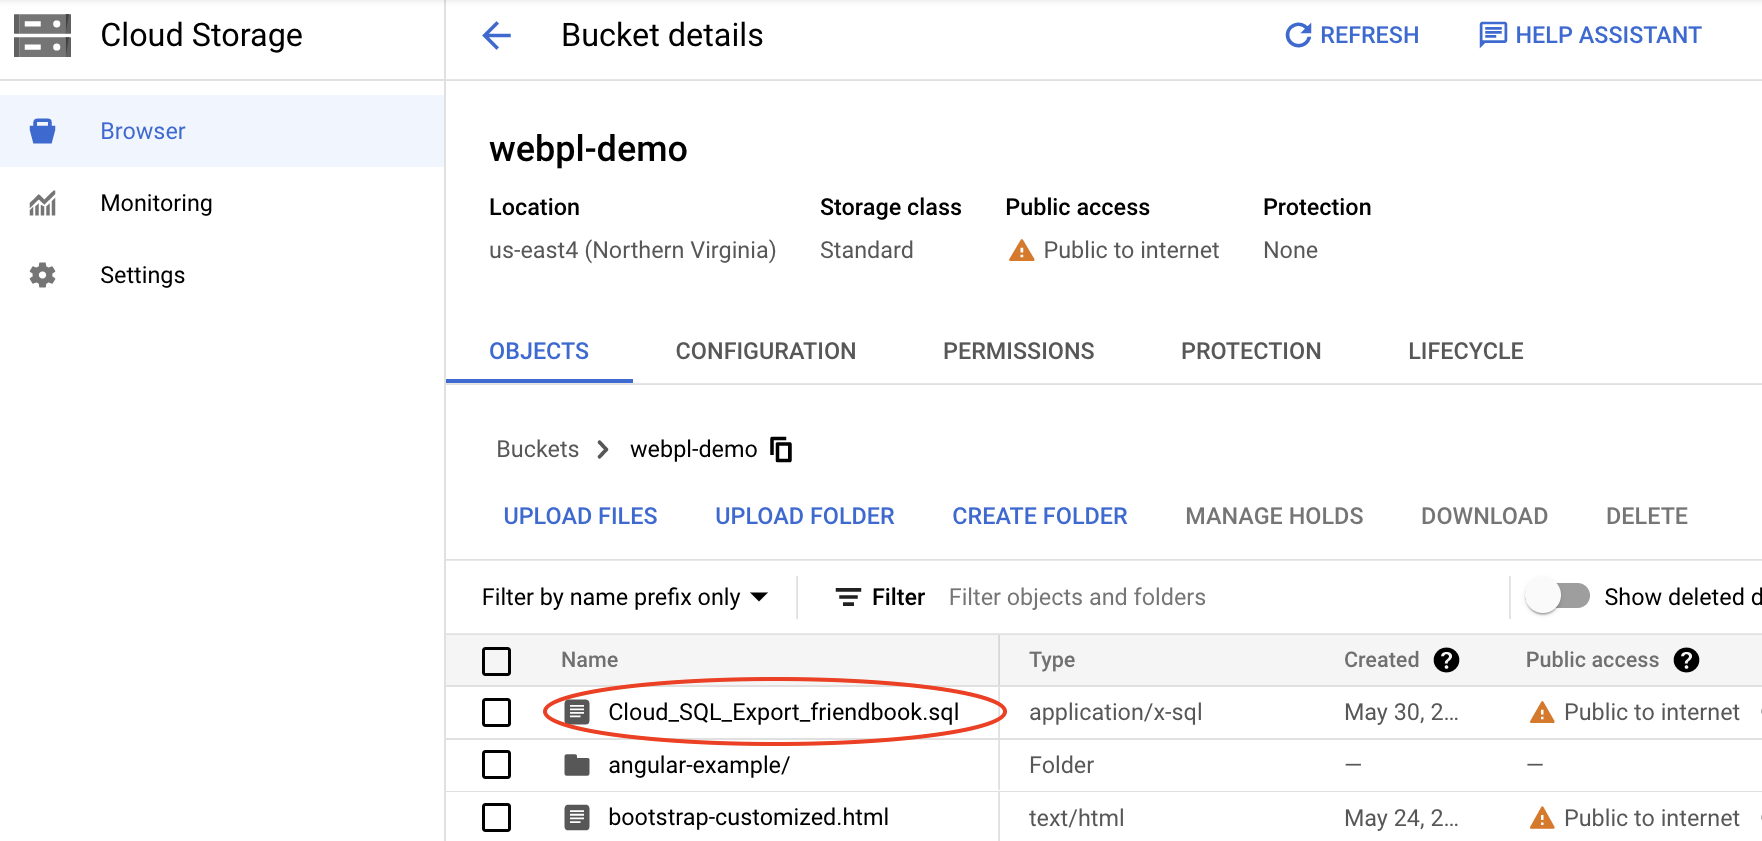
To retrieve the exported file, go to your GCP console — Storage's Browser screen.
Stop SQL instance
Go to GCP console, on the instance overview screen, click the STOP option.

Note: the SQL instance must be stopped to avoid incurring charges.
Copyright © 2022 Upsorn Praphamontripong
Released under the
 CC-BY-NC-SA 4.0 license.