This page does not represent the most current semester of this course; it is present merely as an archive.
In this lab we'll add some more pipelining to a subset of the Y86 instruction set. In particular, we'll add opl, call, and ret to a five-stage pipeline.
There is a lot of text in this lab. Read it. No, really. Read it all.
hcl2d.dI've added a few updates to hcl2d (last updated 2015-02-25 16:53 EST), including a minor bug fix.
hcl2d.d into your hcl2d/tools foldermake or dmd -O hcl2d.d pegged/*.d pegged/*/*.d from the tools folder (it doesn't matter which)If you prefer, you may instead re-download the entire hcl2d.zip and follow the instructions in the README.md inside that zip or in lab 3.
Download lab6_base.hcl to get a copy of the simulator with a full 5-stage pipeline for irmovl, rrmovl, and cmovXX.
We matched the pipeline registers pretty closely to the textbook. There's a lot there...
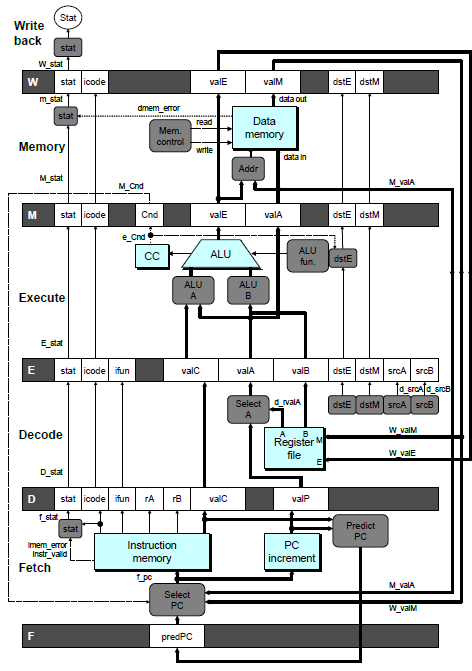
Compare figure 4.41 (a small version is here to the first section (headed "the pipeline and condition code registers" in lab6_base.hcl). Note that we mostly have the same registers, though we removed srcA and srcB from the E register bank because they were never read.
When comparing our HCL to the book, beware that the book calls the inputs to a register by the name of the previous register, while we use the name of the register being updated. Thus, the valC register in bank E is set using d_valC in the textbook but e_valC in our HCL.
Fetch is mostly done for you, though the PC update will need to change to accommodate call and ret. We took care of setting the stat for bad instruction addresses and most names are prefixed with a d_, but otherwise this is pretty similar to the last few assignments...
Decode already has forwarding logic in it. Basically, we look at the output of execute, the output of memory, and the input of writeback and grab any values we can. The order of lines in the mux matters: we grab the closest-to-decode first.
Most of execute is done too, including the condition codes. We set m_stat for illegal ifuns to STAT_INS and correctly handle setting the dstE to REG_NONE for un-met cmovXX. The old conditionsMet wire has been replaced by the cnd register in the M bank, which will allow us to do jump mis-prediction recovery in a later assignment. Note that, to match the book's treatment of the pipeline registers, the ALU currently routes E_valA and E_valC into m_valE for the two implemented move instructions.
Memory is pretty sparse right now. You'll see we already have wired M_valA straight into the memory's data input, which matches the book's design (see Figure 4.59 on page 431). We also took care of setting the stat for bad addresses.
Writeback is really easy, and will not change even for the full Y86 instruction set; all the hard work was done in an earlier phase (picking valE in execute, picking dstE in decode and execute, etc).
The "pipeline register control" section has the skeleton of one of the three kinds of hazards Y86 will have to deal with eventually: the retHazard. If there is a ret we have to stall F (and thus also bubble D). Later on you'll add loadUse and mispredicted, but not in this lab.
OPlFor the most part, this is hooking up the same wiring you had in the previous lab and homework to the pipeline registers:
OPl uses srcA, srcB, and dstE.OPl uses the ALU...OPl doesn't use the memory stage.Once this is done, opl.ys (also available as opl.yo) will yield
| EAX:        0   ECX: fffffffc   EDX: fffffffb   EBX:        3 |
| ESP:        0   EBP:        0   ESI:        0   EDI:        0 |
and cmovXX.ys (also available as cmovXX.yo) will yield
| EAX:        0   ECX:      ace   EDX:      ace   EBX:        0 |
| ESP: ace EBP: ace ESI: ace EDI: ace |callFor the most part, this is hooking up the same wiring you had in the previous lab and homework to the pipeline registers. One difference is that the books' suggested pipeline does not have valP propagating all the way through, so we can either use valA (like the book) or add valP ourselves.
Decode: We'll also need valP later (so that we can write it to the stack during the Memory phase), but there is no valP in the E register bank. Either add a register that can store valP to the E and M register banks or put valP into valA since valA gets carried on to the Memory phase.
call both reads from and writes to %esp, so we'll need to set at least one src_ to read it and at least one dst_ to write it later on. The written value will come from the ALU (because we're writing the result of a subtraction) so we want to use dstE. If you used valA for valP, use srcB for reading %esp; if not, either srcB or srcA will work.
%esp.valP (either in valA or in the new register field you added to E and M) to the new %esp value (which will be in valE because it was output by the ALU). This involves setting addr, dwrite, and wdval.Writeback: already done for you.
Once this is done, call.ys (also available as call.yo) will yield registers
| EAX:        0   ECX:        0   EDX:        0   EBX:        0 |
| ESP:       fc   EBP:        0   ESI:        0   EDI:        0 |
and memory
| 0x000000f_: 0b 00 00 00 |retBig idea: ret propagates through the stages, reading and changing %esp and reading from memory. The value read from memory is not stored in a register, however; instead it is used to set the pc for the next instruction. Thus we'll need to stall F and bubble D until the ret gets to register bank W, at which point we'll need to fetch from the value read from memory.
For example, if we ran instructions a, b, c, d, ret, and then returned to instruction e, we'd see (where sx means "stalled, repeating x and bnop means "bubbled, hence a nop):
| Stage | cycle 1 | 2 | 3 | 4 | 5 | 6 | 7 | 8 | 9 | 10 |
|---|---|---|---|---|---|---|---|---|---|---|
| Fetch | a |
b |
c |
d |
ret |
sret |
sret |
sret |
e |
f |
| Decode | a |
b |
c |
d |
ret |
bnop |
bnop |
bnop |
e |
|
| Execute | a |
b |
c |
d |
ret |
nop |
nop |
nop |
||
| Memory | a |
b |
c |
d |
ret |
nop |
nop |
|||
| Writeback | a |
b |
c |
d |
ret |
nop |
Fetch: right now the code always fetches from the predicted location, but for ret that won't work. Instead, we want to fetch as soon as the value read from memory by the ret instruction is available; that value first becomes available as the output of the W register files' valM. But we don't always want to fetch from there or else mrmovl would act like a jump too; only fetch from that location if the W icode was a ret.
pc.call, ret both reads from and writes to %esp. Unlike call, it does not need to keep valP, but it will need to know both %esp + 4 (for writeback) and %esp (for memory); the easiest solution is to load %esp into both srcA and srcB (as well as dstE, as with call).%esp%esp (pre-addition). This involves setting addr and dread.retHazard: we want to stall fetch if there is currently a ret in a later stage. In particular, if the icode in D, E, or M is ret, there is a retHazard.
Note that there is no icode in F, and even if there was we wouldn't want to stall F based on F or else it would never stop stalling. We also don't need to stall if there is an icode in W because we have already loaded the correct pc after memory and before writeback.
The logic about what to stall and what to bubble is already set; just initialize retHazard to the correct hazard-detection code.
Once this is done, callret.ys (also available as callret.yo) will yield registers
| EAX:      ace   ECX:      ace   EDX:      ace   EBX:      ace |
| ESP:       a0   EBP:        0   ESI:        0   EDI:        0 |
and memory
| 0x0000009_: 1d 00 00 00 0b 00 00 00 |Submit a file named lab6.hcl on the submission page.
If you didn't have time to finish everything, still submit what you have (it's OK if it is incomplete; we are looking for effort more than correctness).